These super sweet handmade fairy wings are perfect as part of a diy costume for fancy dress or halloween! They’re actually really simple to make, and children will just love playing fairies and showing off their own handmade wings!
Here’s what we used
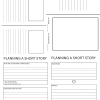
- *Optional – Our free fairy wings template (available at the bottom of this page)
- 3 pieces of Coloured card
- Scissors
- A pen
- A permanent marker
- Glue
- Glue gun
- Decorations (ie tissue paper, paint, sequins)
- Laminator and laminating pouches
- Hole punch
- Elastic
How to make our handmade fairy wings.

Take your first piece of card and draw one of your fairy wings onto it. If you have downloaded our template, you can simply cut out and draw around wing 1.

Now, it’s time to draw your second wing. This time, you’ll want to draw it facing the opposite way to the first. So, if you had the inner wing on the left before, draw it on the right this time. Again, you can use our provided template and use wing number 2.

Decorate your fairy wings in any way that yourself or your children would like to. On this set we used a toilet roll to paint hearts just like we did on our toilet roll valentines cards. But we’ve also used tissue paper and sequins on other wings too.
Once you have your decorated pieces, you’re going to need to pop them to one side until they are completely dry.

Cut out a rectangle around 8cm tall and 16cm wide. Or use our template rectangle to draw around.
Once dry, take your laminator, laminate all three of your pieces (2 wings and 1 rectangle) then cut off the excess laminate from all of your pieces.

Now take your hole punch and punch four holes into your rectangle shape, ensuring that the top and bottom hole on each side are aligned. This rectangle shape will be the divider bar that will go across the child’s back to space the wings out. The wings will attach near to where the holes are punched so you can measure it against your child’s back to determine where to punch your holes and how much of a divide they need between the wings.

Now that you have your holes punched, assemble the wings and rectangle together on a flat surface in front of you. Ensure that the holes you punched onto your divider rectangle are safely on your wings and not too close to the edge. (We tried to leave around 2 cm gap from the wings edge)
Once you’re happy with your placement, take your permanent marker and make a dot onto the wings in the centre of the punched holes of the divider. Just like you can see in the image above.

Now take your hole punch and punch holes through where your marks are. Not to worry if your hole punch doesn’t quite reach the marks, just punch them as close as you can to the marks.
Take your glue gun and glue the divider onto the wings so that the holes all match up.

Now simply take two good lengths of elastic (the size depends on the size of the child, I always overestimate the amount I need as its easier to make them smaller than it is to make them bigger!) Thread your frist piece of elastic through the holes on the left and tie the two ends together. Repeat this process on the right-hand side, and then your super cute and easy handmade fairy wings are ready for play!
We just love these cute diy fairy wings, but please note that children should always be supervised when playing with their wings and to practise good safety these wings aren’t suitable for children under the age of three.