Living out in the countryside we’re lucky enough to have a whole host of animals living in the fields near our house. The kids love going on walks around the area and spotting all the local wildlife and farm animals. At the moment my little girl is particularly fond of sheep, so we decided today to make something sheepy! We really enjoyed making this cute yarn wrapped sheep craft and hope you do too!
Here’s what we used
A piece of cardboard (we used a bit of old box)
White yarn
White and black paper
Scissors
Tape/glue
How to make this yarn wrapped sheep craft
Grab the piece of cardboard and cut out a cloud shaped piece.
Take the loose end of yarn and secure it firmly to the back of your cloud shape using tape/glue.
Wrap the yarn around the cardboard shape in varying directions until it is well covered as well as nice and puffy! Snip the remaining yarn off and glue the loose end down on the back of the sheep shape.
Cut out a mushroom shaped head and add a face to the front of it. Next cut out two rectangle legs and glue the legs and head to the front of the sheep. Your yarn sheep is finished! Aren’t these just adorable?!
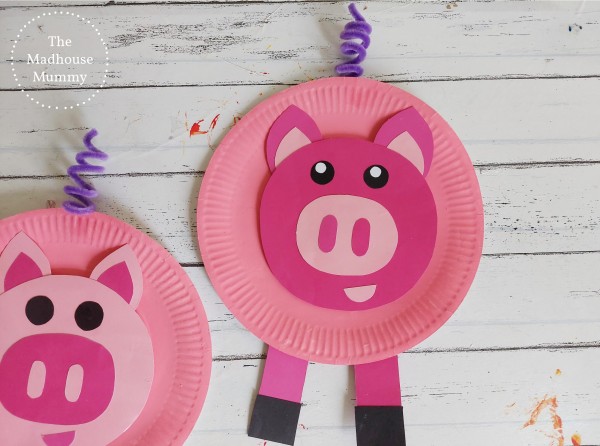
We recently visited a local play farm and the kids had the most amazing day playing there and learning about the different animals and their needs. We’ve been making a lot of animal crafts recently but we noticed we hadn’t really made any farmyard ones. Their favorite animals at the farm were the giant pigs so we decided to make something piggy first and this wiggly paper plate pig craft is just so adorable!
Here’s what we used
Paper plate
Pink paint and paintbrush
Pink card
Googly eyes
Black marker
Scissors
Glue
How to make a paper plate pig
Take the paper plate and paint it pink before popping it aside to dry.
Cut out a large pink circle for the pig’s head. Cut out two pink triangular ears and two smaller inner ears. Glue them together and then onto the top of the pig’s head.
Cut out a large oval for the pigs snout and glue it down centrally on the circle. Add two small oval nostrils, a semi circle mouth and two small round eyes.
To give the pig it’s fun little wobble, Cut out two long thin strips of paper and glue them together at a right angle. Take turns folding the strips one over the other and glue together at the end to make a spring.
Glue one end of the spring to the centre of the paper plate and the other to the back of the pig’s head.
Cut out two rectangle legs and two black square trotters. Glue a trotter at one end of each leg and then glue the other end of each leg onto the back of the paper plate.
Take a pipe cleaner and wrap it around a pencil to make a curly tail. Glue or tape the tail in place and once dry the paper plate pig is finished!
How adorable is this little easy paper owl craft? My son is really interested in owls right now, both because there are quite a few around where we live and because we recently started reading a bit of the first Harry Potter book. He thinks Hedwig is the best companion ever and is most disappointed that he isn’t old enough to go to Hogwarts! So, instead we made some little pretend owl companions of our own to keep at home. Can you guess which is his?
You will need
Thick paper or card (we used; brown, white, black, orange and yellow)
Scissors
Glue
First you will need to cut out two strips of paper to make the owl’s head and body. You’ll need one strip to be 1-2cm wider than the other so that when rolled the head is smaller than the body.
Roll your two strips into tubes and secure them with your glue.
Now to make your owls face! Cut out two round circles for the iris, two slightly smaller black circles for the pupils and two small white circles for the light spots. Glue the three pieces together to make the eyes as you can see above. Take your yellow paper and fold it in half. Using the fold line as the base cut out a triangle to give you a folded beak shape.
Glue both eyes down on to your smallest tube. Then glue one half of the beak down too, leaving one half free.
Now take your yellow paper and cut out two little feet. From your owl coloured paper you will need to cut out two wing shapes. Make a small fold at the base of your wings to create a tab you can stick them on to your owl with.
Glue the feet down at the bottom of your bigger paper roll. Then, using the tabs you created, stick the wings down on the upper inside of the tube.
Glue your two tubes together and mount on to a piece of coloured card/paper at the feet. Your basic paper owl is finished! Doesn’t he look cute? Want to add two horned ears like you can see on our brown owl? Check out the photo below.
If you want to add some horned ear pieces to your owl simply cut out two long ear shapes. Then, just like you did with the wings fold a small section at the base to create a tab. Use these tabs to secure the ears on the upper inside of your smaller tubes and then fold the ears upwards.