How cute is this simple toilet roll flower craft? These little flowers are a great project for kids to work on with a grownup. They look fabulous on display and are perfect for gifting for mothers day or valentines day too!
Heres what we used
Paper rolls
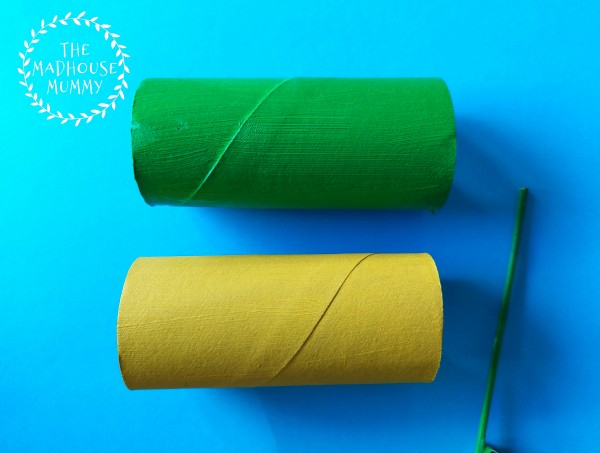
Paint & a paintbrush (we used green for the stem and leaves & yellow for the petals)
Black marker
coloured paper
Scissors
Glue (we used a glue gun but pva and pegs work too!)
How to make this toilet roll flower craft
Start by taking the paper rolls and stem item and coating them in colored paint. we used one yellow roll, one green roll and one painted green skewer (with the pointy end chopped off!) Per flower.
Cut your coloured paper roll into 5-7 rings. For this flower we used 5.
Pinch the rings at each side to form the petal shapes. Using a blob of glue at one end, glue a petal on either side of the stem. Then continue to glue the petals around ensuring they are glued to the petal on either side of it.
Cut out a coloured circle to make the centre of the flower and use a black marker to add some seeds. Glue the circle down in place.
Take the green paper roll and cut out some thin green rings. Pinch them at either end to make the leaf shape and then glue them onto the stem. Once dry your toilet roll flower craft is finished! Aren’t these just the sweetest?
These adorable little bookworm bookmarks are so sweet and simple. They’re perfect for young readers or as a handmade gift for loved ones! We originally made one for Granny but i liked them so much that my little guy wanted to make one for me too and aren’t they just the sweetest?
Heres what we used
Coloured card
Scissors
Glue
Googly eyes
Pen
How to make these bookworm bookmarks
Start by cutting out the rectangle shape of your bookmark. Then take your scissors and cut out 6-8 little circles. Glue them into an zig-zag pattern to make the bookworm’s body.
Add a face to your bookworm. For ours we added two googly eyes, a paper mouth and two antennae. Once the eyes had secured a little we used a pen to draw around them and add some glasses.
Next it’s time to make book. Cut out a rectangle strip of card that is the same height as your bookmark and then fold it in half to make the book. Trim the width as necessary. Then cut out a slightly smaller rectangle from your white paper and glue it into the centre of the book to make the pages. Use a marker to add a special message.
Finish off by adding any optional decoration and your bookmarks are ready to use or gift!
These adorable heart shaped pizza cards are perfect for a variety of occasions!
Today were back with a little twist on one of our older crafts – the pizza heart card! We thought it would be cute if instead of sticking the hearts onto a card we made the cards themselves heart shaped and we weren’t disappointed! How cute are these little cards? They’re super simple, quick to make and are perfect for a whole range of occasions such as valentines day, fathers day, mothers day and more!
Here’s what you’ll need
Coloured card (we used beige, red, yellow, grey and pink)
Scissors
Glue
How to make our heart shaped pizza cards
Take your pizza base coloured card and fold it in half. Using the bottom corner as the point draw a heart onto the card. Remember to leave part of the fold intact otherwise you’ll end up with two heart shapes rather than one heart card! Once happy with your shape, cut it out.
Cut out a slightly smaller red heart and glue it centrally on to the front of the card.
Now its time to cut out your toppings and glue them onto the front of your card. We went with a classic cheese, ham and mushrooms!
Finish off by adding a special message on the inside and your pizza heart card is ready to gift!
How cute are these yarn wrapped hearts – Perfect for gifting!
It’s a little bit late to be sharing these for valentines day but we made them a couple of days ago and I think they are just too cute not to share! These little hearts are so sweet and fun to craft and are fab as little handmade gifts for children to make and gift for valentines day, mothers day, fathers day, birthdays and much more. The best part is that they’re so simple and quick to make too!
Here’s what you’ll need
A piece of cardboard (an old box will do!)
Yarn
Stapler or tape
How to make these yarn wrapped hearts
Take a piece of old cardboard and cut out the base shape of your heart. Attach the end of the yarn onto the heart using either tape or staples.
Wrap the yarn around the heart several times until you get a nice thick and puffy heart shape. Don’t worry if the yarn slips during the first couple of rounds, it gets easier as the heart gets bigger and you have more yarn for it to catch on. Once you’re happy with the size of the heart, snip off the yarn and tie your loose end around one of the strands on the heart before gentle tucking the loose end into the heart.
To use the yarn heart as a hanging ornament simply cut out a length of yarn, thread it under the yarn at the top center of the heart and tie it into a knot.
As a mother there is no amount of money that can buy you a gift so cherished as one made by your child. This little DIY mothers day frame is really sweet and straightforward to make and it looks great at home or on an office desk. So why not share the love this mothers day with this easy DIY craft.
You will need
Paint and paintbrush
4 thick popsicle sticks
White and Coloured Paper
Glue gun/strong glue
Scissors
Marker
Start off by painting your popsicle sticks in your chosen colours. We used light pink and light purple. When you’ve finished, pop your sticks aside to dry.
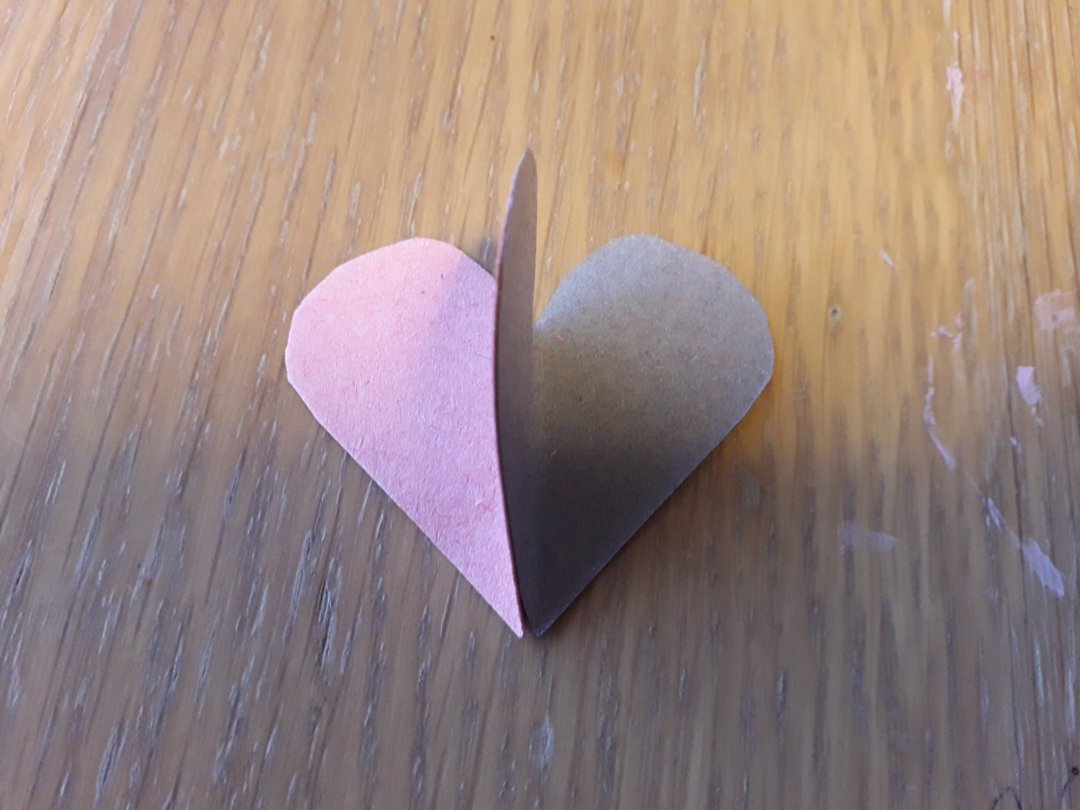
Whilst your sticks are drying you can make the decorations for your frame. To make the hearts put two coloured pieces of paper together and cut a heart shape out of them. cutting both at the same time will give you two equal size and shape hearts. Fold both your hearts In half. Glue one half of one heart to one half of the other. This should give you the t shape that you can see above. You’ll need to make two of these.
To make the daisies, cut out a white flower and then glue a yellow circle in the centre. You’ll need two daisies.
Once your sticks are dry glue them into a square as you can see above.
Add your little handmade decorations to the corners and optionally write a message on your frame. finish off your frame by cutting out a picture and gluing it to the back of your frame. Now all thats left is to do is gift your creation to a special someone!