This cute and easy paper snowman craft is super simple to make and is an adorable winter or Christmas keepsake that can be kept for years to come! all you need are a few basic materials and our simple to follow guide to keep the kids entertained with this fun little craft on these cold winter days
Here’s what we used
Clean cardboard tp rolls (x2 or 3)
Paper (white, brown, black and orange)
Ribbon
Thick cardboard
Scissors
Glue/double sided tape
How to make our cute paper snowman craft
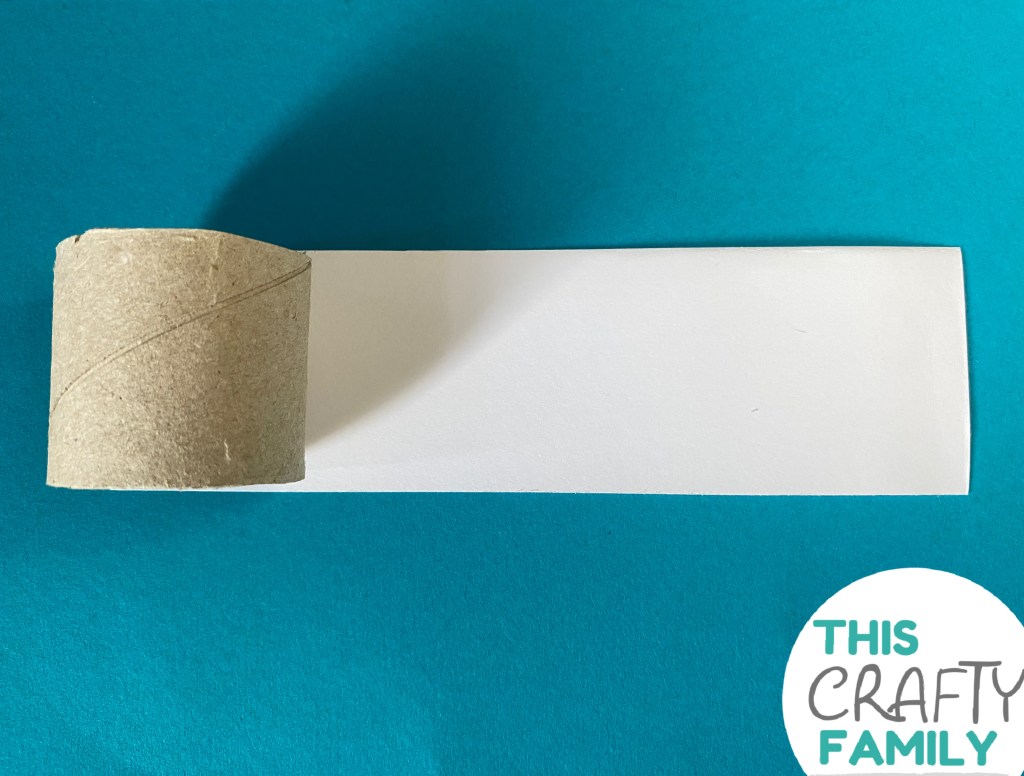
Start by taking your tp roll tubes and cutting them down to three different lengths. A small one for the head, a medium one for the centre of the body and a large one for the base of the body.
Next take one of your tp roll sections and cut out a strip of white paper the same height as the tube and wide enough to wrap around it. Add double sided tape to the edges of the paper and then secure it around the tube.
Repeat the previous step with the remaining two tp sections until your snowman is completely white. Use your double sided tape to attach the three tubes together as above.
Cut out two stick arms and glue them in place inside the middle tube.
Next cut out and glue on your facial features and some buttons. We cut ours from coloured paper and then used our acrylic paint markers to add the details.
Add any other additional decoration such as our foam hat or ribbon scarf. Then finish off your snowman by cutting out a circular shape from your thick card and sticking it to the bottom of the snowman to help it stand. Aren’t they just the sweetest?
We love to see how your crafts turn out. Did you know you can share them with us on Facebook and instagram?
These beaded candy cane ornaments are so much fun for children and grown ups of all ages to make! They only require a few simple resources and are super easy to make which means they’re the perfect craft for families as well as groups such as schools and clubs. We love the way ours look hanging on our Willy wonka themed Christmas tree and the best part is if they’re done right they’re super durable which means they’ll last for years to come!
Here’s what we used
Pipe cleaners
Beads
Thread/ribbon
How to make our beaded candy cane ornaments
Take your first bead and thread it on to one end of your pipe cleaner. Bend the pipe cleaner around the bead and then twist the two section of pipe cleaners together to secure.
Now thread the remaining beads on to your pipe cleaner. My daughter has been learning all about patterns at school so for us this was a perfect opportunity to practise repeating patterns.
Take the loose end of pipe cleaner and tuck it back in through the beads and then twist it firmly to the main body of the pipe cleaner to secure.
Take a length of your thread or festive ribbon and thread it through two of the top beads. Tie it onto a secure loop and cut off any excess. Twist the loop so that the knot is hidden inside the beads and then your super cute beaded candy cane ornaments are ready to hang!
We gave these old wood slices a fun and festive makeover and don’t they just look adorable? These super cute wood slice snowman ornaments are small and lightweight and hang on the tree perfectly! They look super cute and effective and we can’t wait to make a whole snowman family for our own tree.
Here’s what we used
Wood slices
Acrylic paint pens
Foam
Ribbon
Glue gun
How to make our wood slice snowman ornaments.
Take your white paint and cover the front of your wood slice and then pop it aside to dry
Use your paint markers to give the snowman a face. We added two coal eyes, a little point carrot nose and a wiggly smiley mouth.
Add any additional decoration such as our foam hat, a bow, a bobble hat or whatever takes your fancy! We love using foam instead of paper as it tends to last better year after year.
Cut off a length of ribbon and tie it into a loop, glue the loop onto the back of your snowman and once dry your adorable Wood slice snowman ornaments are ready to hang and display!
These super cute Christmas wreath tree ornaments look amazing hung on the Christmas tree and only require 3 basic materials to make too. They’re perfect for at home crafting and for group crafting too!
Here’s what we used
Pipe cleaner
Christmas beads
String or ribbon
How to make our Christmas tree wreath ornaments
Start by taking a selection of beads and threading them onto your pipe cleaner until they cover just over half the length. My daughter has been learning patterns at school so we threaded ours in a repeating pattern!
Once you’re happy with your design, pull the ends around into a circle and twist them together
Fold each length of pipe cleaner into a loop and then twist them together in the middle to make a bow.
Take a length of string, thread it through the first bead on either side of the twisted pipe cleaner and then tie it into a loop. Your super cute Christmas tree wreath ornaments are ready to hang on the tree!
These cute popsicle stick Christmas tree ornaments are so simple and easy to make and the look fab hanging on the Christmas tree too!
We just love how bright and colourful these look when they’re covered in Pom Pom baubles but you could decorate yours with anything you like! We love to see your creations, you can share them with me on social media; you can find the link to our Facebook and instagram at the bottom of this page.
Here’s what we used
Popsicle sticks
Acrylic paint pens (paints will work great too!)
Pom poms
Glittery foam
Ribbon
Scissors
Glue/glue gun
How to make our popsicle stick Christmas tree ornaments.
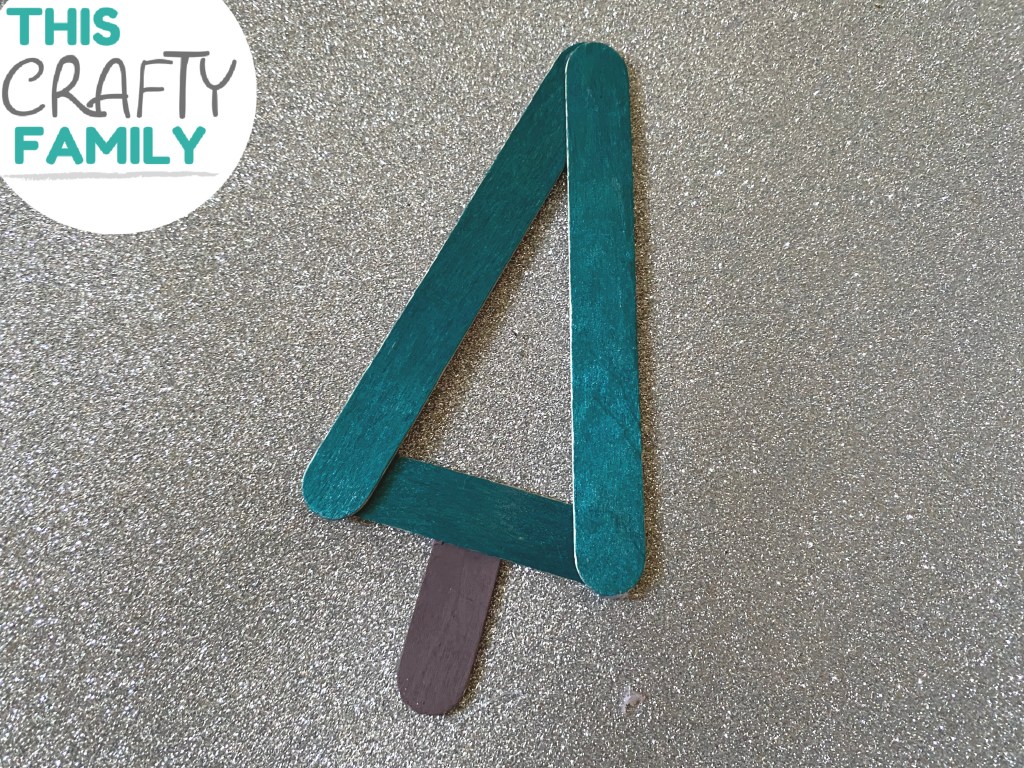
Start by taking your popsicle sticks and cutting them to the sizes that you can see above. You’ll need two full length sticks and one stick just over half the size with the ends cut to make the tree and an end section of stick to make the trunk. Then use your paints or markers to colour in the sticks before popping them aside to try.
Once your sticks are dry take the two full length ones and glue them together in a point, glue the shorter stick across the bottom to make the triangle shape of the trees and then finally add the final stick at the bottom to make the trunk.
Next decorate your popsicle tree ornament, we used colourful Pom Poms to make baubles but you can use anything that you like!
Cut out a glittery star for the top of the tree and stick it down in place
Finally tie a length of your festive ribbon into a loop and glue it down on the back of your ornament so that it can be hung on the tree. Once dry your ornament is ready to display! Aren’t these just the sweetest?