These cute pompom heart shaped bookmarks are so easy to make and are great to make for your favourite book or for children to make and gift! These are great for Mother’s Day, Valentine’s Day, Father’s Day and a variety other occasions!
Here’s what we used
Coloured yarn
Scissors
Thick lollipop sticks
Glue gun
Coloured markers
How to make our heart shaped pom pom bookmarks
Start by taking your coloured yarn and wrapping it around your fingers several times until you have a good, chunky amount stacked up.
Gently remove the yarn from your fingers.
Take a small length of string and tie it across the centre of your Pom Pom ensuring that you pull it very tight.
Take your scissors and cut all the way around the edge of the Pom Pom at the centre of the loops.
Fluff your Pom Pom up and trim the scraggly ends, ensure that you don’t over trim as you will need to shape it a little later.
Repeat this process until you have 3 little Pom poms.
Take your glue gun and glue the three pom poms together into a triangular shape
Trim your Pom Poms down into your desired heart shape.
Once you are happy with the shape of your heart glue it down onto a thick lollipop stick and then add your special message to the front of the stick.
These cute little Pom Pom love bunnies are just adorable as little handmade gifts and the best part is that they’re super easy to make too! Whilst you can use tacky glue I’d definitely recommend an adult With a glue gun to help stick your little ones bunnies together, that way the stay safe and secure for even longer.
My little girl had so much fun making these and now has a whole pack of bunnies ready to hand out to her friends and grandparents on valentines day!
Here’s what we used
Yarn
Felt
Googly eyes
A small Pom Pom
Foam
Patterned paper
A glue gun
Scissors
How to make our Pom Pom love bunnies
Start by taking your coloured yarn and wrapping it around your fingers several times until you have a good, chunky amount stacked up.
Gently remove the yarn from you fingers. Take a small length of string and tie it across the centre of your Pom Pom ensuring that you pull it very tight.
Take your scissors and cut all the way around the edge of the Pom Pom at the centre of the loops.
Fluff your Pom Pom up and trim the scraggly ends to get it into shape.
Next take your felt and cut out a large heart shape for the feet and two outer bunny ears. Optionally also cut two inner ears from patterned paper and glue them onto the felt outer ears
Glue the feet in place on one side of the pom Pom and the ears on the other side.
Add two Googly eyes and a little Pom Pom nose to make the face.
Cut out a little strip of foam (or card), add a little heart to one end and then glue the other end to the feet of your bunny. Finally add a special message and your super cute Pom Pom bunny message is ready to deliver to someBUNNY special!
These cute popsicle stick Christmas tree ornaments are so simple and easy to make and the look fab hanging on the Christmas tree too!
We just love how bright and colourful these look when they’re covered in Pom Pom baubles but you could decorate yours with anything you like! We love to see your creations, you can share them with me on social media; you can find the link to our Facebook and instagram at the bottom of this page.
Here’s what we used
Popsicle sticks
Acrylic paint pens (paints will work great too!)
Pom poms
Glittery foam
Ribbon
Scissors
Glue/glue gun
How to make our popsicle stick Christmas tree ornaments.
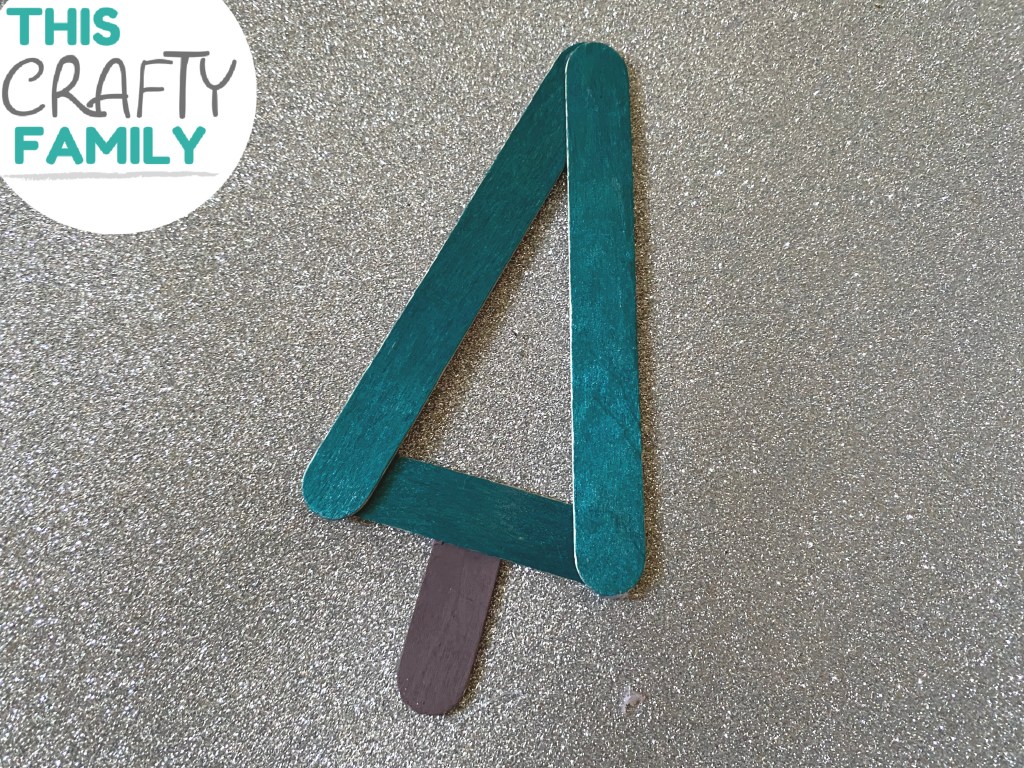
Start by taking your popsicle sticks and cutting them to the sizes that you can see above. You’ll need two full length sticks and one stick just over half the size with the ends cut to make the tree and an end section of stick to make the trunk. Then use your paints or markers to colour in the sticks before popping them aside to try.
Once your sticks are dry take the two full length ones and glue them together in a point, glue the shorter stick across the bottom to make the triangle shape of the trees and then finally add the final stick at the bottom to make the trunk.
Next decorate your popsicle tree ornament, we used colourful Pom Poms to make baubles but you can use anything that you like!
Cut out a glittery star for the top of the tree and stick it down in place
Finally tie a length of your festive ribbon into a loop and glue it down on the back of your ornament so that it can be hung on the tree. Once dry your ornament is ready to display! Aren’t these just the sweetest?
These adorable spiders are so quick and easy to make and are great as homemade halloween decor hung from the ceilings or even just as a cute incy wincy spider inspired craft!
I love to see your home creations, did you know I’m now on Facebook and instagram? You can share them with me there!
Here’s what you’ll need
1 large Pom Pom
1 small Pom Pom
4 pipe cleaners (depending on the size of the pom poms you are using you may be able to use 2 pipe cleaners and chop them in half)
Two Googly eyes
Glue gun
How to make our adorable Pom Pom spider
Take your small pom pom (which will be the spiders head) and use a small blob of glue to attach it to the larger pom pom which will be the spider’s body.
Glue your pipe cleaners centrally across the underside of the spiders belly so that you have 4 legs sticking out each side.
Attach two eyes to the front of your spiders face and optionally add any details such as fangs on a mouth.
Finally bend the pipe cleaners upwards and then outwards to create the shape of the spiders legs. Aren’t these little Pom Pom spiders adorable? We added some stretchy elastic to the back of ours to make a web for the kids to bounce him up and down with!
This cute and simple to make Easter bunny craft idea is perfect for both kids and grownups alike!
You will need
Clean tp roll
Paint
Coloured card
Scissors
Glue
Googly eyes
Pom pom
A pen
How to make this adorable Easter bunny craft idea!
Take your toilet paper roll, cover it in your chosen colour of paint and then pop it aside to dry.
Cut out two rounded outer ears and then two smaller coloured inner ears. Glue the inner ears onto the outer ears and then once dry stick the ears in place on the inside of the toilet roll tube.
Cut out two large feet then cut out the small circles and an oval shape from your colourful paper and stick them onto the feet to make the footprints.
Glue two large googly eyes onto the front of the roll and then add a small pom pom nose between the eyes.
Use a pen to draw on the rabbit’s mouth and whiskers and optionally stick on a small white rectangle for the teeth.
Finally add a fluffy pom pom to the back and your adorable Easter bunny craft is finished and ready to display or gift!