Subscribe to our free monthly newsletter to receive your free colourable christmas wordsearch!
This fun little activity is a great way to keep children entertained on a cold rainy day or when jobs need to be done. once they’ve found all of our fun festive words it’s time to pop open the colouring pens and customise the cute illustrations!
This cute paper cup santa puppet is far easier to make than it looks and can provide children with hours of creative and imaginative fun. We just love how ours turned out, my daughter had so much fun making up cute little puppet shows with him and he’s now sitting in place as a tree topper on her tree!
Here’s what we used
Paper cup
Card; red black, white, silver, gold, a skin tone
Pink and red marker
Googly eyes
Scissors
Glue
Double sided tape
Elastic
How to make our paper cup Santa puppet
Take your skin tone colour paper and cut out a strip wide enough to wrap around your cup and tall enough to cover just under a third of it. Stick It down around the base of the cup.
Cut out a v shaped beard and a moustache from your white card. Glue down the beard first and then add a small patch of glue (or tape!) to then centre of the moustache and stick it down on top of the beard as can be seen in the image above.
Stick on two Googly eyes above the moustache. Then take your markers and draw on a little round nose and a mouth.
Cut out a red santas hat and a little circular bobble to go on the end. Glue the two pieces together and then use your double sided tape (or glue gun!) to attach the hat to the inside rim of the cups base
Now take your black card and cut out a long thin strip of card to make a belt and a small square for the inner part of the buckle. You can cut a slightly bigger square from your gold card to make the outer buckle. Glue the belt around the body and then add the larger square to the centre of the belt with the smaller square on top of it
Cut out two red rectangles for the arms and two long strips for the legs. Accordion fold the leg strips back and forwards to give them some bounce. Next you’ll need to make two black mittens and two black boots. Glue the mittens onto the arms and the boots onto the legs and attach each one to your Santa’s body.
Add any other optional decor; we added a white strip around the hat and a sack of presents on his back.
Finally pierce a small hole into the base of the cup and thread through your length of elastic. Tie a large knot on the inside of the cup to prevent the elastic coming through. Once dry your paper Santa puppet is finished and ready to play with, Isn’t he just adorable!?
These 5 super cute Christmas colouring pages are free to download when you join our monthly newsletter and are a fab way to keep the kids entertained on these cold wintery days!
These cute popsicle stick Christmas tree ornaments are so simple and easy to make and the look fab hanging on the Christmas tree too!
We just love how bright and colourful these look when they’re covered in Pom Pom baubles but you could decorate yours with anything you like! We love to see your creations, you can share them with me on social media; you can find the link to our Facebook and instagram at the bottom of this page.
Here’s what we used
Popsicle sticks
Acrylic paint pens (paints will work great too!)
Pom poms
Glittery foam
Ribbon
Scissors
Glue/glue gun
How to make our popsicle stick Christmas tree ornaments.
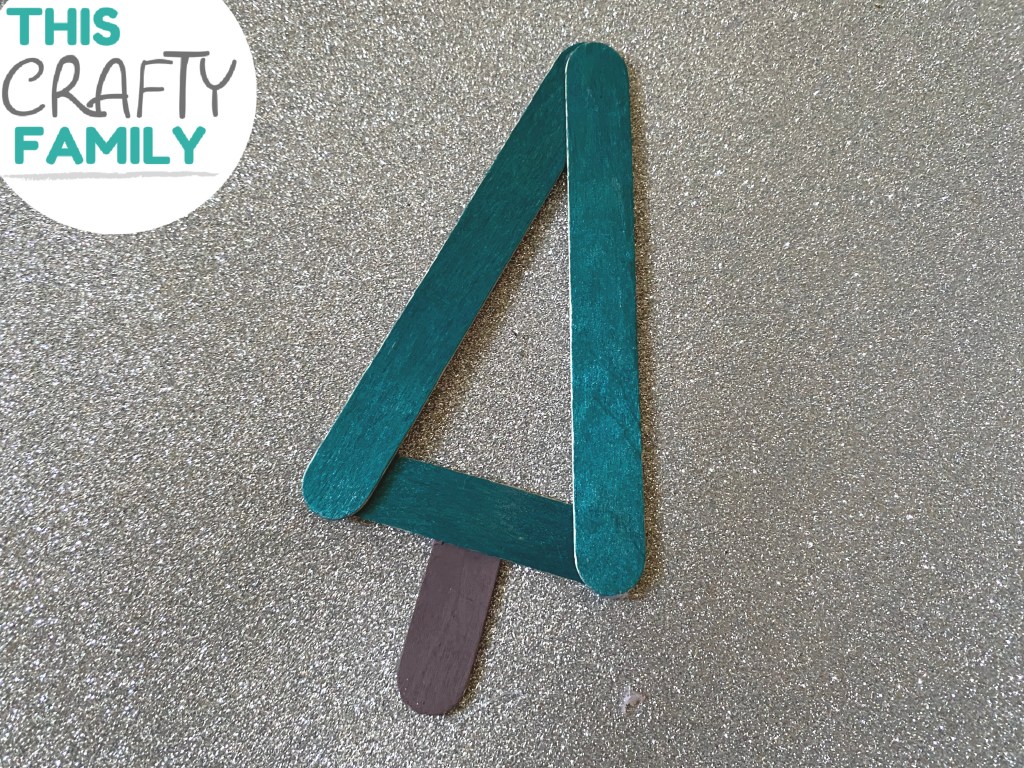
Start by taking your popsicle sticks and cutting them to the sizes that you can see above. You’ll need two full length sticks and one stick just over half the size with the ends cut to make the tree and an end section of stick to make the trunk. Then use your paints or markers to colour in the sticks before popping them aside to try.
Once your sticks are dry take the two full length ones and glue them together in a point, glue the shorter stick across the bottom to make the triangle shape of the trees and then finally add the final stick at the bottom to make the trunk.
Next decorate your popsicle tree ornament, we used colourful Pom Poms to make baubles but you can use anything that you like!
Cut out a glittery star for the top of the tree and stick it down in place
Finally tie a length of your festive ribbon into a loop and glue it down on the back of your ornament so that it can be hung on the tree. Once dry your ornament is ready to display! Aren’t these just the sweetest?
We’re finally on the last school term of the year here in the uk and that means one thing; Christmas is right around the corner and I’m not sure who is more excited, me or the kids! For our first Christmas craft this year we’ve been busy making one our favourites, these jazzy paper plate baubles. We love using these as part of our window displays, they’re easy to mass produce and each one turns out unique which means these are great to make and display for groups such as schools as well as at home!
Here’s what we used
Paper plates
Tissue paper
Red card
Tinsel chenille stem
Scissors
Glue
Glue gun / sticky tape
How to make our paper plate baubles
Start by decorating your paper plate to make the bauble. We glued several different coloured squares of tissue paper onto ours as they will be hanging in the window and tissue paper looks great in the light but you could almost anything. Some popular options include paints, pens and stickers.
Take your coloured card and cut out a trapezium type shape to make the top of the bauble and glue it in place on one side of the plate.
Take a length of pipe cleaner and twist it into a loop to make the ‘string’ for the bauble. Use a glue gun or tape to secure the loop to the back of the trapezium shape as above and once dry your baubles are ready to display!
We love to see your crafty creations, did you know that you can now share them with us on Facebook and instagram? You can find links to our social media’s down below!