How adorable are these little Popsicle stick bumble bees? over the last couple of weeks my little guy has been learning about patterns at school and has since been making patterns with almost everything he finds. This afternoon he came home from school and emptied out the entire box of pom poms (we’re talking like 500 of the things) on to the kitchen table and began organizing them into patterns. He spent ages sat there coming up with different color combos so i suggested that we used the pom poms to make a patterned themed craft and the first patterned thing we thought of were bumble bees! We get a lot of them in our garden during the summer and he loves to watch them. I personally really like these and my little guy now has them stuck up in his bedroom window.
Here’s what we used
Yellow and black pom poms
Lollipop stick
White and black pipe cleaners
Googly eyes
Scissors
Glue
How to make our popsicle stick bumble bees
Cover the lollipop stick in glue and then stick on the pom poms in an alternating yellow/black pattern with a large pom pom for the head. Leave the pom poms to dry in place.
Now take a white pipe cleaner and twist it into a figure of eight to make two wings. Attach your wings onto your lollipop stick between the pom poms by either twisting it on or gluing it like we did.
Cut a length of black pipe cleaner and twist it evenly onto your Popsicle stick, just behind the head pom pom. Then curl each of the two ends to make two antennae. Finish off this cute little Popsicle stick bumblebee craft by adding two googly eyes!
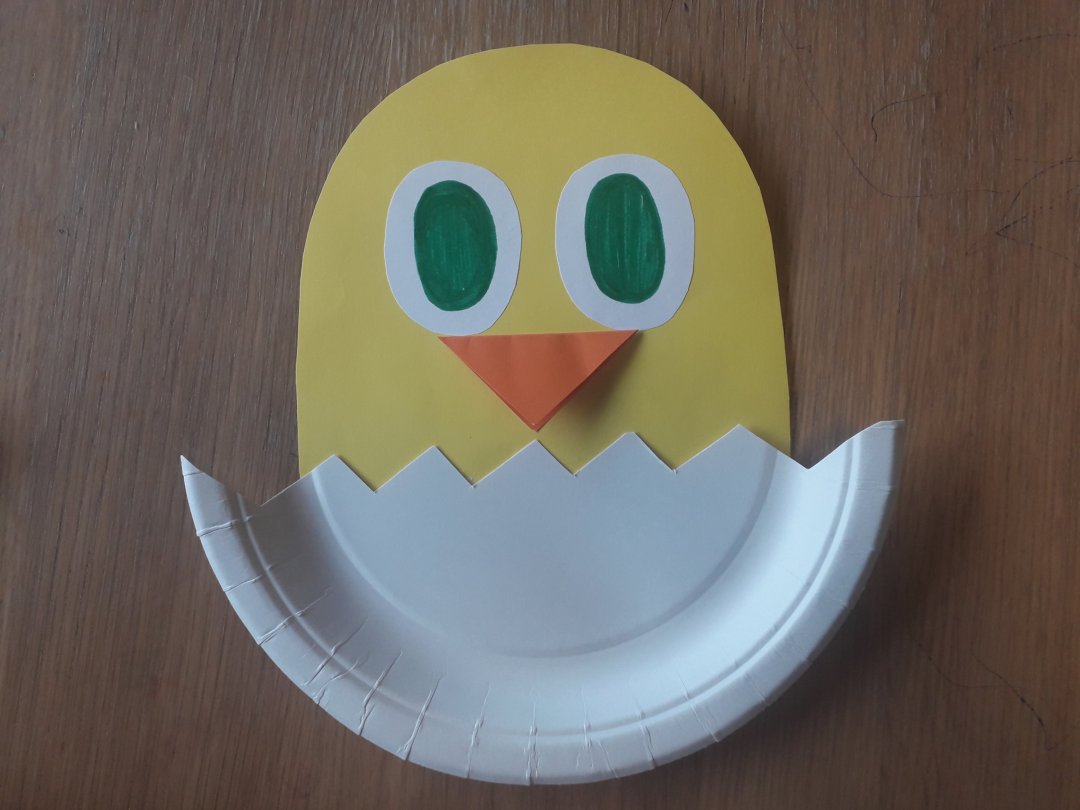
It’s not much longer to go untill spring and i don’t know about you but I really can’t wait for the warmer weather and lighter nights. This week we’ve been busy making some spring crafts and how cute is this little hatching Easter chick craft? My son likes him so much he wants to make a whole nest full!
You will need
Paper plate
Yellow, white and orange paper
Marker pen
Scissors
Glue
First you will need to make your egg shell. Cut your paper plate in half, then cut out some triangles along the straight edge to make your cracked shell.
Take your yellow paper and cut out an arch shape as shown above, this will be your chick’s body.
Glue you chick’s body down on the back of your paper plate egg shell. Then cut out two white ovals for eyes, use a marker to draw on some Pupils and glue them down. To make the beak; fold a piece of orange paper and using the fold as the base cut out a triangle to give you an equal sided diamond. Glue one half of the diamond down in position as the beak and leave the other half loose.
Next you will need to make the paper springs for your chick’s legs. Cut out one long strip of orange paper and one long strip of yellow paper and place them at a 90° angle. Take turns folding one colour over the other to make your spring. Once you reach the end of your paper secure the two loose ends together with glue. Repeat this step to make a second spring.
Glue one end of your spring down in place on your egg shell and then cut out two little feet to glue on the free end. Your little hatching chick is finished! How adorable is he?!