We recently visited a local play farm and the kids had the most amazing day playing there and learning about the different animals and their needs. We’ve been making a lot of animal crafts recently but we noticed we hadn’t really made any farmyard ones. Their favorite animals at the farm were the giant pigs so we decided to make something piggy first and this wiggly paper plate pig craft is just so adorable!
Here’s what we used
- Paper plate
- Pink paint and paintbrush
- Pink card
- Googly eyes
- Black marker
- Scissors
- Glue
How to make a paper plate pig

Take the paper plate and paint it pink before popping it aside to dry.

Cut out a large pink circle for the pig’s head. Cut out two pink triangular ears and two smaller inner ears. Glue them together and then onto the top of the pig’s head.

Cut out a large oval for the pigs snout and glue it down centrally on the circle. Add two small oval nostrils, a semi circle mouth and two small round eyes.

To give the pig it’s fun little wobble, Cut out two long thin strips of paper and glue them together at a right angle. Take turns folding the strips one over the other and glue together at the end to make a spring.
Glue one end of the spring to the centre of the paper plate and the other to the back of the pig’s head.

Cut out two rectangle legs and two black square trotters. Glue a trotter at one end of each leg and then glue the other end of each leg onto the back of the paper plate.
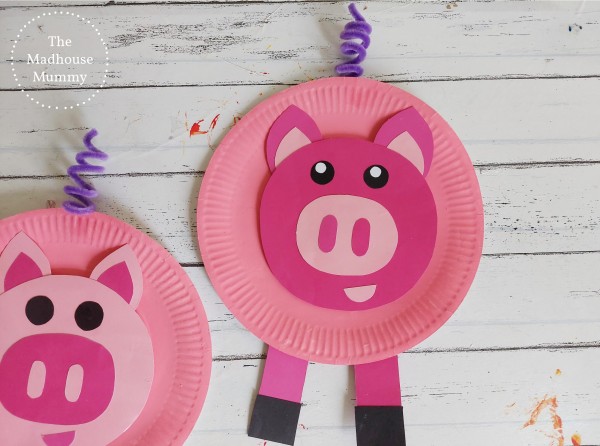
Take a pipe cleaner and wrap it around a pencil to make a curly tail. Glue or tape the tail in place and once dry the paper plate pig is finished!