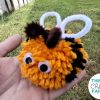
The adorable pom pom bumble bees are full of summer fun! They’re surprisingly simple to make and are super cute as little handmade toys or keyrings.
This week, we have been teaching the kids about the importance of bees and pollination. It has been a real area of interest for both of our children, so we’ve tried to extend the learning with as many activities as possible. We’ve planted a wild flower garden, created a bee hydration station, watched the new netflix documentary, and then finished off with these adorable pom pom bumble bees that my son and I made together. We just love how these have turned out, and it’s safe to say that bumbles may just be my new favourite creature
Here’s what we used
Yellow yarn
Black yarn
Googly eyes
Pipe cleaners
Scissors
Pva glue / glue gun
How to make a pom pom bumble bee
Start by taking your yellow yarn and wrapping a large section around your middle three fingers. You want to make sure you have a good sized thick wad that takes up roughly a quarter of the length of your fingers. Once you’re happy with the amount that you have simply snip it off at the end
Now take your black your black yarn and tie your loose end onto the end of your yellow yarn.
Wrap your black yarn around your fingers until you have a nice thick wax that’s a little bit smaller than the first.
Repeat this process alternating between black and yellow untill you have as many stripes as you like. We usually make the bees bottom end slightly larger to match the head.
Once you’re happy with your bees body you can very gently slip it on your hand and onto a flag surface.
Cut off a length of yarn and tie it very tightly around the cente of your pom pom so that it pulls the two open ends towards the centre and creates a circular shape.
(It’s important to ensure the pompom is tied as tightly as possible to prevent it from falling apart I’m layer steps)
Snip all around the edge of your pom pom, cutting open all of the loops at their centre to create a big fluffy ball, don’t worry if it looks kind of messy at this stage – that’s totally normal!
Use your scissors to trim the pom pom down into a nice round ball.
Now we need to make our bumble bees wings. Take two short lengths of pipecpeaner and twist their ends together to make two wing shapes
Glue the wings down into the body. Now take a length of pipecleaner for the antennae. Fold the pipe cleaner in half, roll up each end into a spiral and then glue the bent centre down into the bee. Finish of your cute little bumble by adding a couple of googly eyes and then leaving it to try.
These adorable Easter chicken baskets are so sweet and simple to make. they’re perfect for little Easter chocolates. We just love these for group crafting and small Easter hunts!
Here’s what we used
A Paper bowl
Paint (optional)
Coloured card
A Googly eye
Ribbon
Glue
Stapler
How to make our paper bowl easter chicken baskets.
Start by taking your paper bowl and cutting it exactly in half. If you are colouring your chicken, then simply coat the bowl in paint inside and out and then leave it to dry.
Take one half of the paper plate and glue a googly eye in position on one end. Then cut out a orange triangle for the beak and glue it down on the back of the paper bowl as can be seen in the picture above.
Now cut out a three bumped shaped for the crest, then stick it down on the back of the chickens head. Add a wing shape to the centre of the plate and leave it a moment to dry.
Cut out a length of ribbon to make the handle for your basket. Staple an end of ribbon to the top of each side of the paper bowl.
Finish by stapling the second paper bowl onto the back of the first to create your easter chick baskets. Why not fill them with some coloured shredded paper ready for hunting some little easter eggs.
These Printable tissue paper mothers’ day cards are so simple and easy for children to make and gift this mothers day. I have both mom and mum available to print depending on where you’re from and how you say it! These are perfect for young children to make and are great for crafting in groups such as at preschools, pre k and afterschool clubs.
Here’s what we used
My free printable mum heart template (available at the bottom of this page)
A4 card
Tissue paper
Glue
Any optional decorational bits (i.e ribbons and bows)
How to make my printable tissue paper mothers day cards
Start by printing out my free printable heart template, which can be found on the bottom of this page. We printed ours directly onto coloured card to save colouring it in. Once you have your template simply cut out the heart shape.
Coat the inside of each letter with a layer of glue. Now take your tissue paper and rip in into small sections. Roll the individual sections into small balls and use the balls to fill in each of the letters.
Take an a4 piece of card and fold it in half. Place your card in the landscape position and glue the heart onto the centre.
Add any optional extra decorations such as ribbon, bows, or extra tissue paper before popping your card aside to dry. Once dry, all that’s left to do is write a special message inside and gift it!
As an avid gamer I’m often being asked by other parents, wives and friends for tips on gift ideas for their gamer loved ones. Often they’re looking to stich the tat and find gifts that aren’t socks or vinyl figurines (i love socks, but seriously there is a limit to the amount you can keep!). Throughout this list i hope to cater for all different budgets. I’ll also hopefully give you some ideas for gifts that your recipient will genuinely love and be able to use time and time again as part of their set up.
1. Headsets
A good headset is a must for any gamer of any age. Not only does it allow you to chat and play with friends, but it also gives you the opportunity to improve sound quality. Good sound can really immerse you into a game and gives you the advantage in competitive games as you can hear approaching footsteps loud and clear.
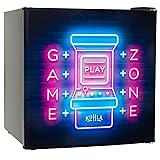
Before creating this list i asked my kids and friends for their opinions on desirable gaming gift. A mini fridge was a surprisingly common answer. Apparently, saving yourself a walk to the kitchen to get a cold drink or snack is a total win!
Because who doesn’t want to game in comfort? A foot rest not only adds that extra layer of cosiness but also helps improve posture and reduce back strain.
My kids are absolutely terrible for leaving their accessories on the the floor and letting them get broken. With a cool accessory organiser, you can keep your bits and bobs safe and also upgrade the look of your gaming set up.
Never let your controllers run out of battery with a charging dock. They’re much more cost-effective in the long run and saves the frustration of running out of batteries mid game.
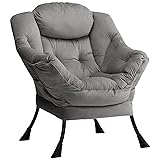
A good gaming chair is a crucial part of any set up, allowing you to play in both comfort and style. Most pc and desk based console gamers tend to go with comfortable and ergonomic high backed desk chairs. However, portable console gamers and tv gamers may opt for something a bit more snug such as a basket chair, arm chair or bean bag.
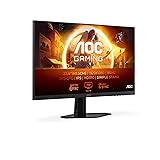
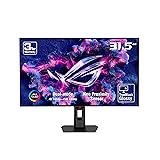
If your recipient is a pc gamer then perhaps they would appreciate a monitor, either as a second/third screen or as an upgrade to their primary monitor. by upgrade i mean in has a higher refresh rate or a better quality screen resolution. in regards refresh rate you’d ideally be looking at a refresh rate of 120hz/144hz upwards for console and 144hz/165hz upwards for higher end pcs with competitive gamers often looking around the 240hz mark.
A basic 1080p (resolution) monitor will do a basic job as a gaming monitor or work monitor but if you want to really enhance your images its definitely worth aiming higher at 1440p or 4k. For the ultimate luxury its worth checking out the 4k oled screens, the display technology of oled allows each pixel to create its only light resulting in the most gorgeous depth and colour that creates a picture which just cant be beaten in darker rooms.
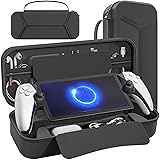
After spending a fortune on a console its important to keep it safe and sound. A good carry case allows you to keep your console protected when taking it out and about with you.
While an elite controller isn’t a necessity its definitely a nice little luxury to have! These controllers are particularly popular with competitive gamers and harcore rpg players. These controllers offer up extra buttons that can be mapped for improved gameplay. The controllers generally have a more weighty superior feel and offer greater customisation.
In this household we all have super fluffy hoodies to relax in whilst gaming because nothing beats being warm, cosy and settling down with a game after a long day.
Driving games on a controller are fun bit jave you ever tried playing them on an actual wheel and pedals? It makes the game so much more interactive and enjoyable, like having the arcade experience at home! Whether its for intense racing games or casual drifting, a wheel is a very desirable luxury!
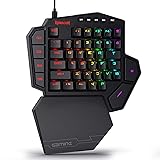
if your recipient has been thinking about switching to mouse and key but finds the jump a bit overwhelming then a one handed keyboard could be a perfect option! Many one handed key gamers insist that it improves their performance and speed and these cute little keyboards can also help improve ergonomics and reduce wrist pain too.
There are so many cool options available when it comes to mousepads. theyre readily available via big retailers. However if you’d like something a bit more personalised I’d suggest shopping on smaller platforms such as etsy. As a gamer myself i generally prefer an xl mouse mat. A larger mat means i can pop both my keyboard and mouse onto it to prevent them slipping. It also means my mouse is a lot less likely to shoot off the end of the mat mid game.
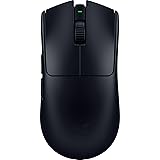
A good mouse is essential for comfortable and fast gameplay. Something that suits weight preference and feels nice in the hand is a real win. A high dpi offers greater cursor speed which is often important forgamers; especially those playing First person shooter games such as call of duty or Fortnite.
I currently run the Steel Series rival 600 which is a more budget option. I love it’s performance and that i can customise the amount of weight in the mouse with removable weights.
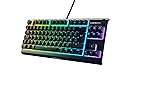
Any keyboard can be used for gaming but having a good keyboard increases the overall quality of the product and can help boost performance. This is particularly true for people who play mmorpgs such as world of warcraft, league of legends, lotro etc. when you’re spamming buttons on a loop a faster response time is definitely a win. Also if you’re like me and have quite short fingers then you may find it more comfortable playing on the smaller 75% keyboards as i do. I currently run the SteelSeries apex 3 tkl and i find the more short and stout design a lot easier to use.
If you’re not sure what games your recipient likes and you’re stuck for ideas then i’d definitely reccomned a gift card for the platform that they use. This means your recipient can treat themselves to a new game or some in game content of their choice.
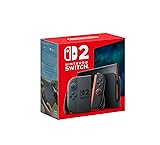
Whilst they’re definitely amongst the priciest of gifts that new console your loved one has been looking at could be the way to go. They’re expensive to buy outright but for the amount of hours they’re likely to be used it could be worth it. if you’re looking to buy a first console then its definitely worth doing some research. some games are exclusive to certain platforms and some games can only be played with players on certain other platforms. So the main questions you need to ask are what do they want to play and who do they want to play with?
Please note this post may contain affiliate links. If you click on any of the affiliate links provided and make a purchase I receive a small commission at absolutely no extra cost to you. This helps me to keep this page up and running and provide free content.


![ELOUYCKE Smart LED Lightbars, Dimmable RGB Flow Light Bars 16 Million Colors TV Backlights, APP Remote Control and Music Sync Gaming Lights for PC, Room Decorative Mood Light [Energy Class A+++] 42cm](https://m.media-amazon.com/images/I/71Uh5pArdmL._SL160_.jpg)