LIKE MY DESIGNS? ALL OF MY BOOKMARKS ARE NOW AVAILABLE FOR PURCHASE VIA MY SHOPIFY AT WWW.BUNNYANDSMOKEY.COM. THANK YOU FOR SUPPORTING MY BLOG AND SMALL BUSINESS!
in this easy tutorial we’ll be going over how to make cute laminated bookmarks. These simple bookmarks are great to make and sell as part of a small business idea. They’re also great as cute and easy handmade gifts for loved ones, teachers and friends!
The first thing im going to do is create the design for my bookmark. To do this i’m going to need to use a design software. For this tutorial i’ll be using canva.com. Canva offers free and paid versions, with the paid version you get more tools and design options but the free version is all you need to get started with making your own bookmarks.
To start im going to head to canva.com. i’m going to click new design and then ill select cm and input the dimensions for my bookmark. i’m going to use 5cm x 15 and then press create. Some people decide to make their bookmarks directly on an a4 sheet however, by doing it this way i can easily input our bookmarks individually onto other softwares and i also then have a single bookmark that i can download images of for marketing purposes.
Now that we have our blank bookmark it’s time to start making our design. For the purpose of this tutorial all of the elements i use will be from Canva. First of all im going to click on the blank bookmark and change the colour of my background
Next I’m going to go over to the toolbar on the left and I’m going to select elements and then graphics. I’m going to type in the search bar to find a specific graphic and then I’m going to add it to my page, drag it and resize it to suit.
Then I’m going to click on text in the tool bar, I’m going to add my text box and then change the font, resize it and add any desired effects such as the black outline.
To finish off my design i decided to fill in the blank spaces, I went back to elements and found a cute star, i added several to the page and then spaced them out and resized them to suit.
Once we’re happy with our design we need to click download in the top corner, i download my bookmark as a png image and save it to my computer.
Now it’s time to prepare the bookmarks to print. For this we’re going to go back and create a new document in canva. this time our dimensions are going to be 29.7cm x 21cm – landscape a4. were going to then click create to open our document
Next we go over to upload on our toolbar and were going to upload our bookmark, we then click on the uploaded bookmark to add it to our document.
Now I right click on the bookmark and select duplicate. I repeat this process until i have 5 bookmarks on my page and then spread them out evenly on the page.
I then drag the boomarks to the centre of the page, you’ll know when you’re in the centre as a crosshair like the one in the image above will appear (this is so that if you decide to double sided print your image on both sides it should align better)
As a personal choice i then add a second page to my document by clicking the icon marked with an arrow above. I then add a large coloured rectangle to my page. this is to make a simple back for the bookmark. You may decide to simply print your design on the back however for this tutorial i’ll be doing a simple colour back as many older printers will struggle to properly align a double sided design and this method should work for everybody.
Now that i have my bookmark design, i’m going to download my document as a pdf print. I’m then going to print my bookmarks. i’ll print my front page first..
Then ill take my printed bookmarks, flip the page over and print my coloured rectangle on the back.
Now i take my bookmarks and pop them into a laminating pouch and run them through my laminator twice. I’ll be using hot lamination but you can use whichever method is your preferred.
Now i have my laminated bookmarks i use my guillotine to cut them out.
And finally i use my corner rounding tool to make my bookmarks look that little bit more professional
**top tip** if you end up with any jagged edges after cutting your bookmarks try running them back through your laminator!
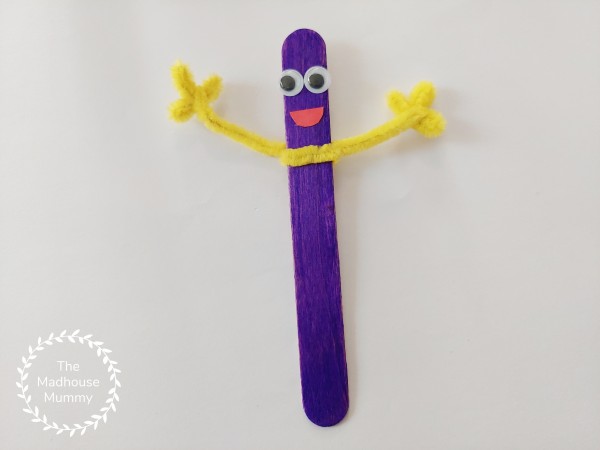
These lollipop stick pals are our favorite kind of craft, each child creates their own designs and at the end you have a variety of different ideas – each one awesome and unique! The kids loved making these and were using them to put on puppet shows from under the table before finally deciding to use them as homemade bookmarks. This little craft is great for groups, simply put out a variety of materials for the children to use!
Here’s what we used
Wide lollipop stick
Paint or felt tip pens
Googly eyes
Coloured paper
Scissors
Glue
Optional decoration bits and pieces
How we made our lollipop stick pals
Using pens or paint colour in the lollipop stick and leave it to dry.
Take the pipe cleaner and shape the ends as desired to make the hands before twisting it on to the lollipop stick.
To make the hands for this bookmark we bent three bumps into the end of the pipe cleaner then twisted the length of the pipe cleaner between one of the bumps to secure before shaping with our hands. We then repeated this on the other side.
Add some fun facial features to the top of the lollipop stick bookmark
And finish off by adding any extra customisations such as hats, clothes or any other decorations!
We’d love to see how your little one’s lollipop stick pal turns out. Did you know you can share them with us on Pinterest or Facebook?
Please note this post may contain affiliate links. If you click on any of the affiliate links provided and make a purchase I receive a small commission at absolutely no extra cost to you. This helps me to keep this page up and running and provide free content.