*please note that this post may contain amazon affiliate links. This means that if you make a purchase from the links provided i may make a small commission. This comes at no extra cost to you and helps me keep this blog running.
A few weeks back, my son asked me if we could buy a puppet theatre to play with. I have to say I was shocked at the prices of some of the puppets that we looked at! I know too well what my son is like, he’ll desperately want something and when he finally gets it he’ll play with it for a couple of days before it disappears to the back of the cupboard for goodness knows how long. It was then that I had the idea that maybe we could make our own DIY cardboard puppet theatre. That way we wouldn’t just spend time together playing with it but also building it too.
My little guy loved the idea and said that he wanted to make a red puppet show. So, when our big craft order arrived we instantly got to work on the box. It’s been so lovely spending so much time together over the last few days. I wasn’t sure how he was going to get on with no school but having him home has been such a pleasure. The best thing about this project is that it’s one we can keep adding to over time by adding new puppets to our collection!
To start with, take your cardboard box and open the ends. Cut off the Back of the box to give you three equal sections as you can see above. Our box was a little bit small so rather than cutting the ends off we glued them together at the corners to make it taller.
Draw your window onto your puppet theatre before cutting it out. Then, cut the top of your theatre into a slight arch.
*just an after thought. If you want to easily add working curtains make sure the sides pieces are a couple of cm higher than the top of your window. We didn’t do this and had to fiddle with our curtains to get them to hang properly.
Now for the fun part! Cover your puppet theatre in your chosen paint. You may want to paint the front and back, we only did the front as we’re running low on red paint!
To hang the curtains you’ll need to make a hole at the top of each of your two sides. They’ll need to be 2-3cm higher than your window. Thread a length of string through one hole, across the middle and out the other hole. Pull the string tightly before knotting the ends securely on the outside of your theatre. My son cut up an old pillowcase to make his curtains and folded them over his string before securing the loose end in place with double sided tape (I had originally planned on tidying the curtains up and sewing them together for him. To be honest though, his double sided tape has held up perfectly).
*If like ours, your curtains a little bit low use some tape or glue in the centre to lift them slightly.
To make your changeable scenery, cut out some different floors (such as grass and sea). Attach magnets to each side. You’ll also need to line up two magnets just beneath your window so you can switch your scenery.
To finish add some decoration to the front of your show. We wanted to keep it as simple as possible so we just glued on some white paper stripes and some yellow stars. once dry you puppet theatre is finished! Doesn’t it look fab? My son is so pleased with his!
*please note this post may contain amazon affiliate links. This means that if you make a purchase via any of the links provided i may make a commission. This comes at no extra cost to you and helps me keep this site up and running*
For the last few days we’ve been working on a new crafty project. With all the time we have had on our hands it has been so lovely having a big project for us to work on. If you haven’t guessed already, what we have been making is our very own DIY puppet theatre and some wooden spoon puppets to go with it. We’ve had so much fun both making our puppets and playing with them and today I’m really excited to be sharing the first of out new creations with you – our wooden spoon princess puppet!
Isn’t she just adorable? Shes been the centre of many of my sons stories, sometimes she is a princess who needs saving and other times she is the one who saves everyone. One thing I have definitely noticed since playing with the puppets is how much it’s helped strengthen my little guys ability to create a story, it’s also helped with his confidence too.
Self adhesive felt (you could of course use regular felt and felt glue but we like to use self adhesive and just peel off the bits we want to stick, this way my son can stick them himself rather than just watching me glue!)
Lollipop stick
Scissors
Glue gun
How to make our wooden spoon princess puppet
To start off glue your lollipop stick centrally across the top of your spoon to make two arms. Next, give your princess some hair, to do this we glued some wool scraps around the curve of the spoon. Add two eyes and a mouth to make her face.
To make the dress, place your puppet onto the back of your felt and draw your dress shape around it on the backing paper. You’ll need to make sure your dress is wider than your puppet in all places.
To save felt you could just stick one dress piece to the front. However we’re planning on using our puppets long term and wanted to make them sturdy as possible. We drew around our dress shape and cut out a second identical piece to make the back. If you decide to cut out a back piece too remember to draw around the dress with both felt sides facing outwards as they will be on the spoon, otherwise your pieces might not match up!
To make our princesses’ cape we cut out a white cape shape with an elongated v shaped collar. The collar might look a bit odd now but it’s how you’ll fold your cape around your spoon.
To attach the dress, stick your first dress piece on to the front and your second on the back. Then pinch them together to meet and stick in the middle. To add the cape place the puppet centrally on it (felt side facing forward). Remove the backing from just a square at the end of each side of your collar and fold the collar over the arms before securing them together at the chest. My little guy then added a cute little bow to look like a fastener.
Finish off your awesome wooden spoon princess puppet by giving her a felt crown and adding any optional decorations. isn’t she just adorable!
With everything that’s going on in the world right now children are facing a lot of isolation and confusion. As parents we personally feel like it’s more important than ever to help our children understand their emotions and know that they are all natural. With that in mind, my son and I sat down and created this sweet little DIY emotions flip book. We had a really lovely chat about the different emotions, what they feel like and when we might feel them. He’s also since been using it in play to decide how his toys are feeling and why.
You will need
Coloured paper
Marker pens
Scissors
Glue
An old CD to draw around
How to make our emotions flipbook
Take a second to plan what emotion faces you want to make and then select all the colours that you will need. Draw around your CD on each and then cut the circles out and fold each one in half.
Open up your circles and draw your different faces on to each one. We also added the names of each Emotion to help my son learn to recognise the words.
Once all your faces are finished, fold them back in half. Glue the faces together so that the back of the bottom half of your first face is glued to the back of the top half of your following face as you can see above.
Keep repeating this process until all of your Emotion faces are glued together one beneath the other.
Finally, cut out a slightly larger circle and wrap it around the outside of your book like a cover. Cut off any excess, decorate the front and you are finished!
Today my son decided he wanted to make something for his little sister. how adorable is that? For the last few days she has been absolutely obsessed with a cardboard tube from inside a foil roll, so I suggested perhaps we should turn it into a magic wand for her. He loved the idea and together we came up with this adorable recycled magic wand craft. For the most part we used recycled materials and after i had glued it together he added some craft buttons too. If you’re planning on making one I would definitely recommended using a glue gun if possible, it just makes them so much stronger. Our magic wand still looks completely untouched, even after being bashed around by a year old all day!
You will need
Long cardboard tube (the ones usually found in foil or cling film/saran wrap)
An old cereal box
Ribbons
Any optional decorations
Scissors
Paint
Glue (we used a glue gun because it’s just faster and the glue is a lot more durable. You can use pva, you’ll just need to peg the pieces whilst they dry, it probably won’t hold quite as strongly either)
How to make your recycled magic wand craft
Take your cardboard tube and paint it in your chosen colour. Once finished, pop it to one side to try.
Take your cereal box and cut out two identical stars. The easiest ways to do this are by either cutting two out at once or by drawing around your first one. Once they have both been cut out, paint them in your selected colour. Put your stars aside to dry.
Once your tube is dry, Cut out 6-8 equal lengths of ribbon and using your glue secure one end of each down on the inside of one side of your tube. Leave the other ends loose.
Glue one of your stars onto the tube and then cover all of it’s back edges in glue before securing the other star on the back.
Optionally add some decorations to your magic wand, then you are finished and ready to cast some spells!
Ok ok, so this craft doesn’t really fit in with our recent theme of quick and simple. Sometimes though, it’s worth putting in a little extra effort to show some appreciation for a loved one and this little handmade fishing jacket card is pretty cute! My son and I made one for a family members birthday, hes really big into fishing, it’s not really my thing but my partner is in to it aswell so we made him one ready for fathers day too. It might only be April but you can never be too prepared (says me who’s always forgetting and having to panic buy presents the day before)!
You will need
Coloured card (we used; green, brown and black)
Coloured paper (we used; white, blue, orange, beige, red, pink, grey and green)
String
Scissors
Glue
Pen
Googly eyes
First you’ll need to take your piece of coloured card. Putting it in a landscape position fold each side in to meet at the centre.
Draw on two small arches to make the sleeve section and then cut them out.
Take the upper inside corners of your jacket and fold them outwards to make a collar.
Next cut out four pocket shapes from your chosen colour.
Now you’ll need to make the contents of the pockets! Start off by cutting out two little arch shapes. Cut a triangle out of the curved side of each one and give each a googly eye to make your fish. Glue your pocket to the front of your fish so that they look as if they are sticking out the top.
Cut out two shiny hook shapes as you can see above and again glue a pocket to the front of them
Next you’ll need to make a float. Cut out a white circle and then draw around it on some coloured paper. Cut out this second circle and then cut it in half, glue one half of the circle down onto your white circle so that is half white half coloured. Then, from the other half cut out a small square and glue it down on the centre of the white edge to make the top of the float. Glue your third pocket down on the front of your float
For the final pocket cut out the shape of a worm. Then either using a pen or paper strips give your worm some stripes. Finish him off by giving him two googly eyes and a smiley mouth, then again glue the final pocket down on the front of him.
Glue your pockets down in place on the front of your jacket. Then, take a pen and write a name tag for your jacket, cut it out and glue it down in place near the collar. The basic shape of your fishing jacket is finished! If you want to add a little fishing rod carry on to the steps below.
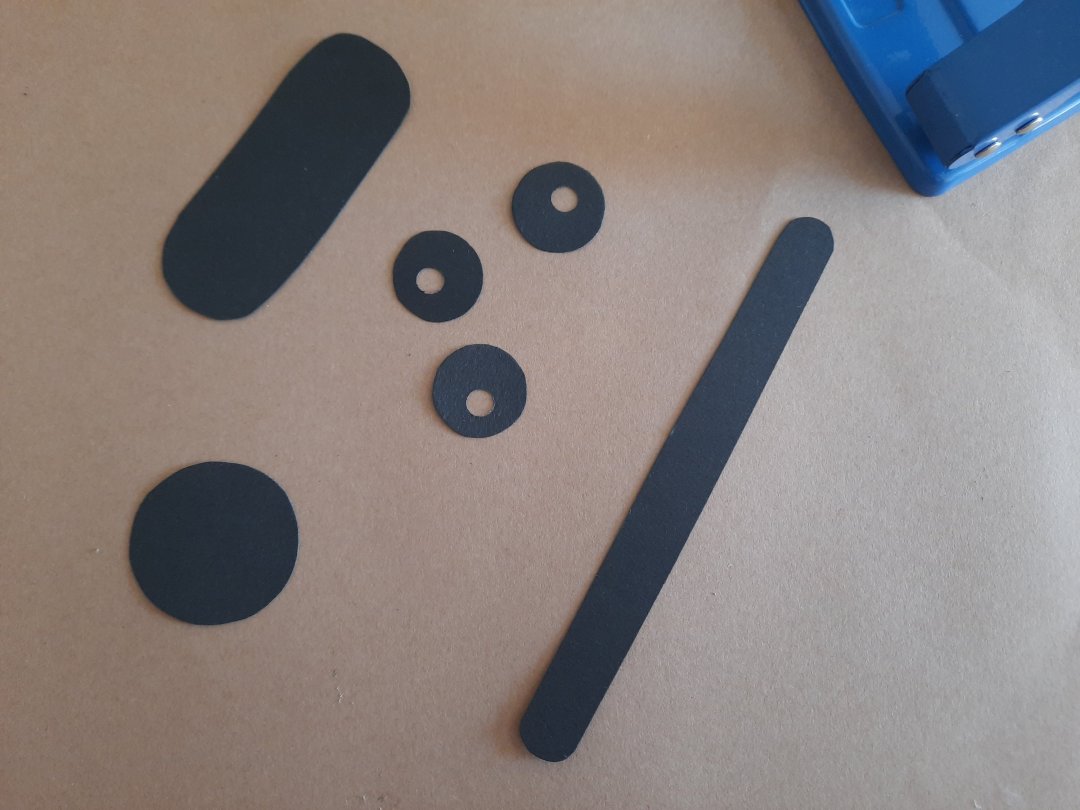
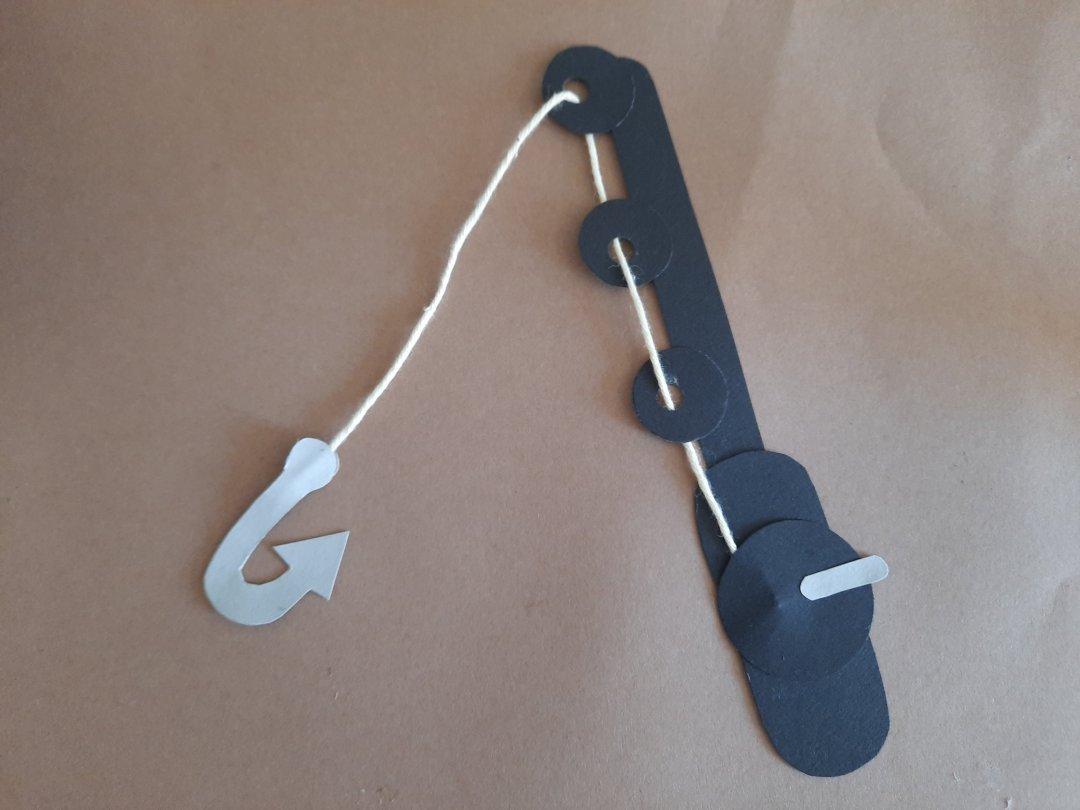
Start off by cutting out the basic shapes of your rod. You will need a black oval for the handle, a rounded strip for the body, a large black circle for the reel and three smaller circles with punched holes for the rings.
Glue the body of your rod onto your handle. Space the three rings evenly across the body. Remember to make sure that the holes are not covered so that you can still thread your string through them.
Glue your string down onto your handle and then cover it over with your remaining reel circle. Then, weave your string in and out up through the rings as you can see above.
Cut out two identical hooks by folding your paper in half when cutting. Glue one hook to the front of your string and then match up the other in place on the back. Finally, cut out a small strip and glue it down onto your reel.l to make the reel handle.
Add the rod to the side of your card..
And finish off by adding your message to the inside. Isn’t it adorable? I think it was well worth the extra effort!
Please note this post may contain affiliate links. If you click on any of the affiliate links provided and make a purchase I receive a small commission at absolutely no extra cost to you. This helps me to keep this page up and running and provide free content.