This adorable handprint flower pot art is so simple to make and is a perfect keepsake to gift for birthdays, Mother’s Day, Valentine’s Day and many other occasions!
Here’s what you will need
Coloured paper
Scissors
Glue
Pencil
How to make our handprint flower vase art
Start by drawing around little one’s hand and then cutting out 3-5 handprints from your different coloured paper.
Next cut out an equal amount of green paper stems to match the amount of handprint flowers. Glue the stems onto the back of the flowers. Then glue the flowers down onto your paper with all the stems directing towards the middle of the page
Cut out the shape of your flower pot and add any extra decoration you would like. We used some ribbon to make a bow on ours! Glue the flower pot down at the bottom of your page across the stems.
Finish off by adding a few paper leaves and any optional extra message and your picture is done and ready to display once dry! Don’t these look adorable?
How adorable is this cute handmade flower card? They’re so quick and easy to make and are perfect as handmade valentines day, mothers day, fathers day, birthday or teacher cards. All you need is a few basic materials!
Here’s what we used
White card
Coloured paper
Marker
Scissors
Glue
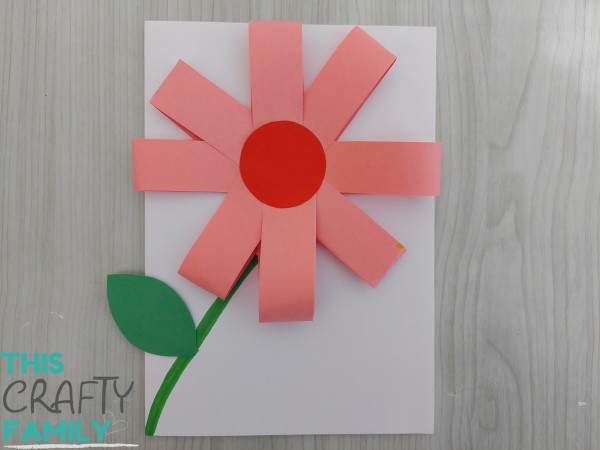
How to make our cute flower card craft!
Start by taking your piece of card and folding it in half to make the card shape. Next take your chosen colour paper and cut out four long strips (we used the entire vertical length of the paper). Glue the Paper down in a star shape on the front of the card as above.
Add a bit of glue to the end of each strip and fold them inwards to stick in the center.
Cut out and glue down a circle to make the center of the flower. Next take your marker and draw the stem of the flower before cutting out and adding a leaf.
Finish off your card by adding a special message to the front and your cute handmade flower card is ready to gift!
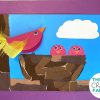
Perfect for valentines day, mothers day, fathers day and more! This handprint lovebird card is so sweet and easy to make and Is a great home made card for a variety of occasions
!
Here’s what we used
Paper and card
Paint
Paintbrush
Marker pen
Scissors
Glue
Eye stickers/googly eyes
How to make our handprint lovebird card.
First start by painting your little one’s hand and then printing it down onto a piece of paper before putting it aside to dry.
Once the hand print is dry cut it out and glue it on to the front of a folded card.
Cut out a heart shaped wing and glue it onto the handprint bird.
Give the little love bird an eye and a beak.
Next take a marker and draw on two little bird legs.
Depending on the size of the child’s hand there may be a small gap left, if so fill in it with a cut out heart shape and finish off by adding a personalised message to the front. Once dry your card is ready to gift, my little girl loved making these for her friends!
This year we’re making it our mission to make sure all of our Christmas cards are handmade for that extra personal touch. These super cute handmade reindeer Christmas cards are perfect for my kids as they are so simple and easy to make but also look super cute too! I hope you and your little ones love them just as much as we do!
Here’s what we used
White and brown card
Gold and red glitter foam
Sticker eyes
Scissors
Glue
How to make our Handmade reindeer Christmas cards
Start by taking your piece of card and folding it in half to make the card shape. Then optionally cut the card down into a square as we have.
Cut out and glue down a large circle near the bottom edge of the card to make the reindeer’s face.
Next it’s time to cut out two sparkly antlers before gluing one on either side of the reindeer’s heal. Cut out two ear shapes and glue one just below each antler.
Finish off the card by adding on two cute eyes and a big red circle as a nose! Aren’t these just the cutest?!
How cute are these yarn wrapped hearts – Perfect for gifting!
It’s a little bit late to be sharing these for valentines day but we made them a couple of days ago and I think they are just too cute not to share! These little hearts are so sweet and fun to craft and are fab as little handmade gifts for children to make and gift for valentines day, mothers day, fathers day, birthdays and much more. The best part is that they’re so simple and quick to make too!
Here’s what you’ll need
A piece of cardboard (an old box will do!)
Yarn
Stapler or tape
How to make these yarn wrapped hearts
Take a piece of old cardboard and cut out the base shape of your heart. Attach the end of the yarn onto the heart using either tape or staples.
Wrap the yarn around the heart several times until you get a nice thick and puffy heart shape. Don’t worry if the yarn slips during the first couple of rounds, it gets easier as the heart gets bigger and you have more yarn for it to catch on. Once you’re happy with the size of the heart, snip off the yarn and tie your loose end around one of the strands on the heart before gentle tucking the loose end into the heart.
To use the yarn heart as a hanging ornament simply cut out a length of yarn, thread it under the yarn at the top center of the heart and tie it into a knot.