Today’s make is only a little one but we still love this paper doily peacock craft. He’s so sweet and simple to make which made it easy to squeeze in some crafting on this busy day! My little guy is back to school tomorrow so today has been a busy day washing and labeling clothes and generally getting prepared. I must say I’m quite nervous about school. We both have mixed emotions about it and I’m going to miss him so much during the days but I know he is desperate to see his friends again. It also means that the dynamic of the blog is going to change too as we won’t have so much time crafting together but don’t worry we’ll still find a way to share plenty of fun crafts for you to make with your little ones!
Heres what we used:
Paper doily
Purple, blue and green paints
Painting sponge
Blue, white and yellow paper
Eye stickers
Scissors
Glue
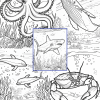
How to make our paper doily peacock craft
First take your paper doily and fold the bottom outer lace edge up to the top inner lace edge.
Use a sponge to lightly dab peacock colours all over the paper doily. Remember to be very gentle and dab rather than brush as paper doilies rip very easily. Once covered, put the doily aside to dry.
Once dry optionally mount the doily feathers onto a piece of white paper. Then cut out a blue oval for the body and a circle for the head and glue them centrally onto the doily.
Cut out a yellow diamond and fold it in half to make a beak. Then cut out and stick two little feet and give him two eyes.
Finish off your adorable paper doily peacock craft by cutting out two little wings and gluing one on either side. Isnt he just adorable? Perfect for framing and hanging on the wall!
*please note this post may contain amazon affiliate links. This means that if you make a purchase via any of the links provided i may make a commission. This comes at no extra cost to you and helps me keep this site up and running*
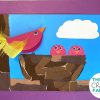
Here is yet another wooden spoon puppet craft that we made to go with our cardboard puppet theatre project. This is my son’s wicked wooden spoon witch puppet and doesn’t she look great! I’ve really enjoyed making these with him the last few days. They’re a bit tricky for him to make alone so we’ve spent a lot of time doing them together which has been so lovely.
When they announced that schools were going to be shut, i did wonder how he would get on being home so much with just his parents and little sister. I am so blessed to say that he has been absolutely brilliant and every day has been a pleasure. He does of course miss seeing his friends and cousins but these little ones are just so resilient. He’s made the best of every day and we’ve been finding whatever we can to do to make the days a bit easier. There’s no denying he’s probably watched a little bit too much paw patrol, but we have also had loads of fun outdoors and plenty of crafting and educational fun indoors and let’s be honest all that really matters is that they’re happy and that they get through this the best they possibly can until we regain a bit of normality.
Start off by taking your lollipop stick and gluing it centrally across the top of your wooden spoon handle – just below the head, this will make the arms. Then, take your puppet and coat it in green paint before putting it aside to dry.
Now it’s time to give your witch some hair, to make ours we glued some wool scraps around the edge of the wooden spoon head. Then add two eyes, a nose and a mouth to make your witch’s face.
Cut out a witches hat and stick it down in place at the top of your spoon head.
Place your witch puppet on to the back of your felt and draw your dress shape around it. You will need to make sure your dress Is a bit bigger than your spoon all the way around.
To save felt you could just stick one dress piece to the front. However we’re planning on using our puppets long term and wanted to make them sturdy as possible. We drew around our dress shape and cut out a second identical piece to make the back. If you decide to cut out a back piece too remember to draw around the dress with both felt sides facing outwards as they will be on the spoon, otherwise your pieces might not match up!
To attach your witches dress lightly stick one side to the front of your spoon and the other to the back. Pinch the two pieces together to meet and stick in the middle. Finish off you wooden spoon witch puppet by adding a magic wand. My son also added some snips in to the bottom of his witches dress too which i think looks fab!