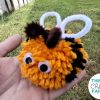
Share the love with this adorable little toilet roll love bug craft!
With everything that’s been going on, Christmas and new year seem to have passed in the blink of an eye and valentines day is almost here already. It seems to us that valentines day is more important now than ever, its a special day for us to share some love with our family and we can’t wait to make and post some fun little valentines gifts/cards.
Heres what we used
Toilet roll
Black/white card
Black/white paper
Pipe cleaners
Scissors
Glue
How to make a toilet roll love bug
Start by taking your empty toilet roll and coating it in your chosen paint and popping it aside to dry. Once dry add two eyes – we used white paper ovals and drew the details on with a marker. Cut out a heart shape for the wings, then fold each side of the heart just off center to create a small section that you can use to glue down the heart shaped wings.
Twist a pipe cleaner around the toilet roll between the eyes and wings so that you have two equal lengths. Curl the ends of the pipe cleaners around to make the antennae.
Finish off by adding some decorations to your love bug! With this one we used a hole punch to cut some little black paper spots to stick on but little hearts look fab too and you can be as creative as you like!
Your little toilet roll love bug craft is finished and don’t they look adorable?
These sweet little beaded heart decorations are so simple and easy to make and don’t they just look adorable? It’s more important now than ever to show a little love to special people in our lives and my kids have made some of these to give to their great grandparents who they haven’t really seen much this year. Its not the same as a little cuddle but sometimes all it takes is a little gesture to brighten someone’s day!
Heres what we used
Pipe cleaner
Beads
Ribbon
Scissors
How to make these beaded heart decorations
Take a pipe cleaner and pinch it into a point at the cente. Curve the two loose ends inwards in a basic heart shape and thread your beads onto the pipecleaner leaving a 1-2cm gap on each end.
Once you’re happy with your decoration, twist the two ends together and then tuck them up inside the pony beads.
Thread a piece of ribbon through the bead which sits at the inside point of your heart and tie the ends together to make a loop. Bend your heart back into shape if necessary and its ready to gift to a love one!
How sweet is this cute little monster card craft? They’re great for almost any occasion and are really sweet and simple to make. My son always says he is a cheeky little monster so these were the perfect craft for him to make and gift!
You will need
Coloured card
White and black card
Scissors
Glue
Take your piece of card and fold it in half. Draw a circle onto your card, making sure you leave a gap in the circle along the fold line as you can see above.
Cut out your circle (again making sure you dont cut along the gap in the fold line, Otherwise you’ll end up with two separate circles rather than a card) snip the bottom of your card to give it a flat edge to stand up on.
Next you’ll need to cut out the circles to make your eyes. You can see above how each inner circle is slightly smaller than the last.
Cut out a big smiley mouth and one big tooth.
Glue your monster’s cheeky face down in place and your card is finished! Now all you need to do is write your special message inside your card and gift it to a loved one.
Crafting isn’t only for big kids. My 1yo loves to craft and paint and when my eldest is at school i love to sit down and spend time painting with her. Today was her grandmothers birthday so made this toddler finger-paint berry heart card, isn’t it sweet? the best part is that it can be as spotty and smudgy as your toddler chooses and it will still look adorable!
You will need
Red card
Green and Yellow Paint
2 Googly eyes
A marker pen
First you will need to make your card shape. Take a rectangle strip of card (we usually quarter a piece of A4 to make four cards) and fold it in half. Trim your card to make it into a square. Draw on the curves of your heart as you can see above. Cut out your heart shape.
Now its time to fingerpaint your card! Add some green fingerprints for leaves and some yellow fingerprints for seeds.
Finish off your the front of your berry heart card by giving him two googly eyes and drawing on a smiley mouth!
Now all that’s left to do is write your message inside and gift your heart to someone special.
As a mother there is no amount of money that can buy you a gift so cherished as one made by your child. This little DIY mothers day frame is really sweet and straightforward to make and it looks great at home or on an office desk. So why not share the love this mothers day with this easy DIY craft.
You will need
Paint and paintbrush
4 thick popsicle sticks
White and Coloured Paper
Glue gun/strong glue
Scissors
Marker
Start off by painting your popsicle sticks in your chosen colours. We used light pink and light purple. When you’ve finished, pop your sticks aside to dry.
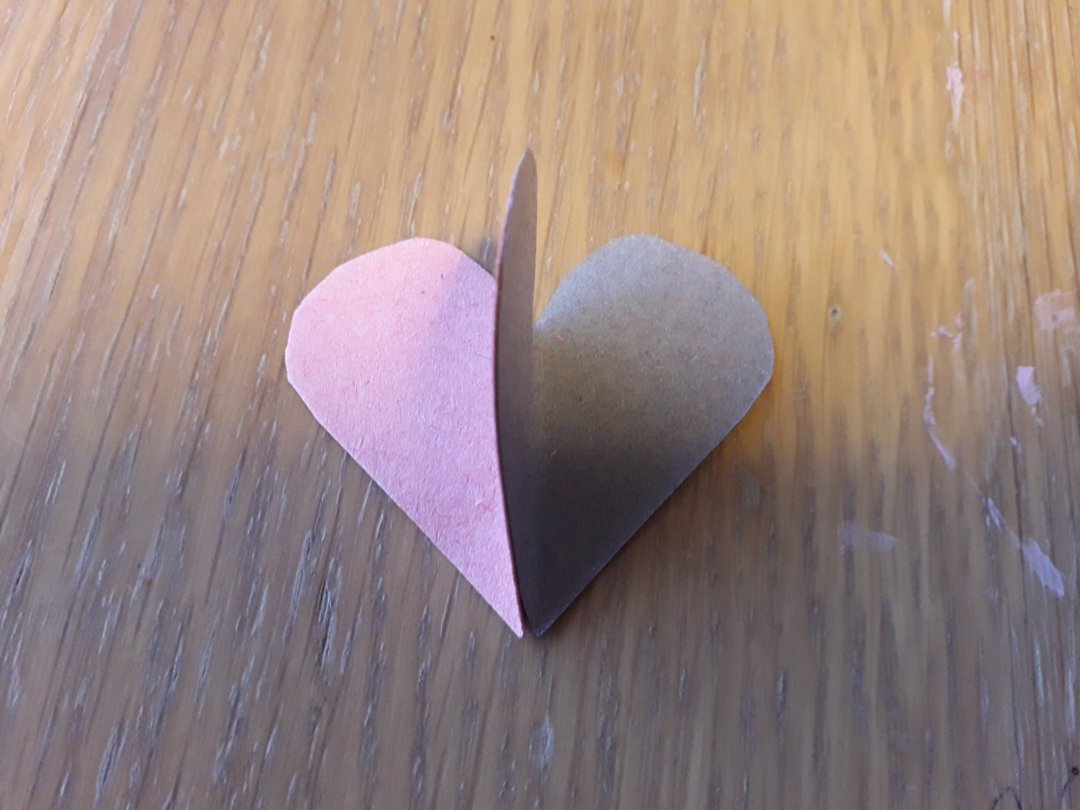
Whilst your sticks are drying you can make the decorations for your frame. To make the hearts put two coloured pieces of paper together and cut a heart shape out of them. cutting both at the same time will give you two equal size and shape hearts. Fold both your hearts In half. Glue one half of one heart to one half of the other. This should give you the t shape that you can see above. You’ll need to make two of these.
To make the daisies, cut out a white flower and then glue a yellow circle in the centre. You’ll need two daisies.
Once your sticks are dry glue them into a square as you can see above.
Add your little handmade decorations to the corners and optionally write a message on your frame. finish off your frame by cutting out a picture and gluing it to the back of your frame. Now all thats left is to do is gift your creation to a special someone!
Please note this post may contain affiliate links. If you click on any of the affiliate links provided and make a purchase I receive a small commission at absolutely no extra cost to you. This helps me to keep this page up and running and provide free content.