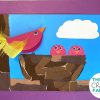
These easy paper roll birds are perfect as a fun spring craft for at home or for preschools too! Each bird turns out so beautiful and unique and children can switch up their own designs to make their favourite kinds of birds. My kids really enjoyed making these. We looked at pictures of different birds on google and tried to copy them – we made a robin, a peacock and some parrots. I just love how these turned out!
Heres what we used
Paper roll
Paints & paintbrush
Googly eyes
Coloured paper
Scissors
Glue
Feathers
How to make these cute paper roll birds
Start by taking the paper rolls and cutting them down to the desired size. Now it’s time to coat them in the coloured paint before putting them aside to dry.
Once the paper rolls are dry, cut out two little bird’s feet and glue them to the bottom of the roll.
Now its time to give the birds a face! Add two eyes, a beak and any other facial features.
Finish off the paper roll birds by adding some feathers to Make a tail and optionally some wings! How adorable are these cute little critters?
We use a lot of pom poms in our crafting, they’re just so much fun! We also have a basket of them on the side which the kids use for pretend snowball fights. They’re so versatile and so easy to make too, so I thought I would show your our favorite 2 ways to make perfect pom poms!
Method 1 – using a pom pom maker
Pom pom makers are our go to when we want perfect pom poms. This brand in particular is great especially when crafting with kids. They’re nice and chunky so are easy to grip and the ridges are a helpful guide as to when the pom poms are ready to snip. if you want to spend a little i highly recommend these clover pom pom makers (availabe here for our American friends) – there is a very good reason why they’re so popular!. We find that these are the best way to get perfectly round and fluffy pom poms but if you’re looking for a fast and free way why not check out method 2 – finger pom poms!
Take your yarn and wrap it around one side of the pom pom maker. Continue wrapping it around until its even all the way across. This particular brand of pom pom maker is super handy because you’ll know its ready when the ridges are totally rounded. But otherwise you can just adjust your yarn to your desired thickness – we usually do 3-4 layers when using dk yarn.
Repeat the previous step on the the other side of the pom pom maker.
Place the scissors inside the gap on the edge of the pom pom maker. Slowly snip all the way around both edges making sure you hold the pom pom maker together securely.
Take a separate length of yarn, slot it through the edge of the pom pom maker then pull it into a taught knot. Bring the two ends of yarn around to the other side of the pom pom maker and tie it into a double knot to secure.
Pull open the two arms of the pom pom maker and separate the two halves. Remove the pom pom, fluff it up, then take the scissors and trim it down removing any stray ends. Your perfect pom pom is finished! These pom pom makers are fab, we love using ours.
Method 2 – making pom poms using fingers.
Wrap the yarn several times around the middle three fingers (you can adjust the amount of fingers you use to alter the sizes).
Once you’re happy with the thickness of your yarn, carefully slip if off of your fingers and onto the table. Take a length of string and tie it around the centre of your entire yarn, flip the pom pom around and tie it on the other side in a double knot to secure.
Pop your scissors into the edge of your pom pom and slowly snip the loops open at their central point. Fluff up your pom pom.
Take your scissors and snip all around your pom pom until you are happy with it. Though the pom poms don’t turn out quite as perfect looking this way they are still super cute, plus its fast and free!