So, today’s crafts is a little bit unusual but there is actually a little story behind it. Almost a year ago now my niece and I were out shopping and she spotted this adorable tea cup planter with some flowers in it. She absolutely loved it and really wanted to buy it for her mum. Unfortunately though I didn’t have my purse with me. So, I said how about we make our own crafty version for you to give to mum? Anyway as it so often does with kids, the whole thing got forgotten – until a couple of days ago. She came over for the day as her parents were working and out of the blue she suddenly remembered it! So here is our cute little handprint flowers and teacup craft!
You will need
Coloured paper
Scissors
Glue
pencil
Alternatively if you don’t want to make your teacup from scratch, why not print and colour our free printable teacups?
How to make our handprint flowers and teacup craft.
First you’ll need to cut out the basic shapes for your teacup. To make the saucer we cut out a circle from half a piece of paper, we then cut out a rectangular piece (approximately 25cm x 9cm) for the cup itself and a small rounded off strip for the handle.
Fold a small 1-2cm strip along the bottom of your large rectangle. Then, make several small equally spaced snips along this strip so that they just touch the fold line. These will be your tabs to glue down your teacup.
Glue one end of your teacup rectangle and then secure it to the other end to give you your round teacup shape. Then use the folded tabs that you just cut to glue the cup on to the saucer. Finish your teacup by gluing on your handle as you can see in the picture above.
Now to make the flowers! Place little one’s hand on to a green piece of paper, then draw around it and cut it out. Decorate each fingertip with some paper flowers.
Finally, finish off your cute handprint flowers and teacup craft by decorating your teacup and then gluing your flowers inside of it. Doesn’t it look cute? This little craft is perfect for gifting for birthdays, mothers day or valentines day!
In our craft cupboard we have this huge jar of buttons which has been overflowing for weeks. So today we made these cute cards to keep in the cupboard in order to empty the jar a little. Now we have 8 cute button card crafts to share with you! They’re so adorable and each one can be used for various different occasions. Which one is your favourite?
1) You are Grape!
What we used; Card, buttons, glue and a marker.
How to make it: Take your buttons and glue them down in a triangular shape to make your bunch of grapes. Then use your marker to draw on the stalk before adding your special message.
Perfect for: Birthdays, teacher gifts, mothers day, fathers day, thank you card and valentines day.
2) Cute as a button family.
What we used; Card, Buttons, marker and glue.
How to make it: Glue your buttons down on your card at the relevant heights. Then use your marker to draw on the stick people bodies and add details such as hair, clothes or ears. Why not add a cute button sun too? Just stick down a yellow button and draw on the lines with your marker!
Perfect for: mothers day, family birthdays and fathers day.
3) Cute pizza pizza card
What we used; Card, Buttons, marker and glue.
How to make it: Glue a line of yellow buttons to make your pizza crust. Then add a triangle of red buttons to crust to make your pizza base. Add some small buttons to make the pizza toppings and then use your marker to write on your message.
Perfect for: Fathers day, Mothers day, Birthdays and Valentines day.
4) Super star card
Here’s what we used: Card, Buttons, glue and a marker.
How to make it: Glue a large yellow button in the centre of your card. Then add five medium buttons around the large one and then a small one at the end of each. Use your marker to write your special message
Perfect for: Birthdays, thank you card, teacher gift, mothers day and fathers day.
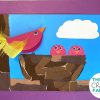
5) Your a real Tweetheart!
Here’s what we used; Card, Buttons, googly eyes, glue and a marker.
How to make it: Draw your lines across your card. Glue a couple of buttons scattered just above each line then use your marker to draw on the legs and beaks. Add a googly eye to each bird and then write a message on the front of your card using your marker.
Perfect for: Valentines day, Birthdays and Mothers day.
6) Sweet and simple button heart
Here’s what we used; Card, red paper, buttons, glue and a marker.
How to make it: cut out a red paper heart and cover it with your buttons. Glue your heart down onto your card and use your marker to add a special message.
Perfect for: Valentines day, mothers day, fathers day and birthdays.
7) Pretty button flowers
Here’s what we used; Card, buttons, a marker and glue.
How to make it: Glue down a button to make the centre of your flower. Then glue 5-6 buttons around this central button to make the petals. To make the lavender; take five equal sized buttons, glue four into a square and then add the fifth in the centre above this square. Use your marker to draw on the stems and leaves and then to write on your special message.
Perfect for: Mothers day, birthday and Valentines day.
8) Sweet cherry card
Here’s what we used; Buttons, glue and a marker.
How to make it: Glue two red buttons a couple of cm apart. Take your marker and draw two joined cherry stalks and a leaf. Repeat this process to create a second pair of cherries and then use your marker to add a personalised message.
Perfect for: Birthdays, Valentines day, Mother’s day, Father’s day, thank you card, Teacher card and Valentines day.
Don’t you just love this cute pasta lion card? With all the hot weather we’ve had this week, crafting has been the last thing on our mind. Thankfully it’s been a cooler today and we decided it was time to wheel the craft drawers back out, especially as we had a birthday card we needed to make! We wanted to make something a bit different and just love how this turned card turned out.
Here’s what we used
Dry pasta
Orange paint
Coloured paper (pink and beige)
Card
Black marker
Eye stickers
How to make our cute pasta lion card
Take your pasta and cover it in your orange paint before putting it aside to dry.
Whilst your pasta is drying it’s time to make the lions face. To make your face shape draw a circle and then add two semi-circles near the top as you can see above. Once you have your shape, cut it out.
Cut out and glue down two small semi circles for the ears and a triangle for the nose.
Give your lion two eyes and then use your marker to draw on a mouth and some whiskers.
Once your pasta is dry, take your piece of card and fold it in half. Glue your lion’s face onto the card, then use a generous amount of glue to secure your pasta in a circle around the head to make the mane. Add your personalised message and your lion card is finished! Doesn’t he look fab?