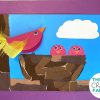
Perfect for valentines day, mothers day, fathers day and more! This handprint lovebird card is so sweet and easy to make and Is a great home made card for a variety of occasions
!
Here’s what we used
Paper and card
Paint
Paintbrush
Marker pen
Scissors
Glue
Eye stickers/googly eyes
How to make our handprint lovebird card.
First start by painting your little one’s hand and then printing it down onto a piece of paper before putting it aside to dry.
Once the hand print is dry cut it out and glue it on to the front of a folded card.
Cut out a heart shaped wing and glue it onto the handprint bird.
Give the little love bird an eye and a beak.
Next take a marker and draw on two little bird legs.
Depending on the size of the child’s hand there may be a small gap left, if so fill in it with a cut out heart shape and finish off by adding a personalised message to the front. Once dry your card is ready to gift, my little girl loved making these for her friends!
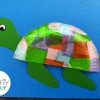
This Cute paper doily lion craft is perfect for those quiet rainy days at home. We’ve been planning to make some doily crafts for a while now as we have a huge pack of them. My little guy never really liked to use them before as they’re so easy to tear but now he’s a little bit bigger he finds it much easier. The trick is to keep them as dry as possible by using only a little paint. We love how our lions turned out and we’ve added them to our ever growing safari craft collection! Why not have a go at making your own doily lions?
Here’s what we used
Paper Doily
Paint (We used orange, yellow and brown)
Paint sponge
Coloured paper
Black marker
Scissors
Glue
Take your sponge and lightly dab your coloured paints on to your doily – remember less is more as paper doily’s will quickly tear if they get too wet. When you have finished pop your doily to one side to dry.
Cut out a large coloured circle for the face followed by two small circles for the ears and then two smaller pink circles for the inner ears.
Glue the pink inner ears onto the small orange ears, then glue them in place on the back of your face circle. Glue your lion’s head down onto the doily mane.
Now glue two eyes to your lions face. To make ours we used two large white circles, two slightly smaller black circles and two more small white circles for the light spots.
Take your black marker and use it to draw on your lions nose, mouth and whiskers. Your cute paper doily lion craft is finished! Doesn’t he look cute?
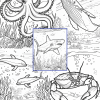
I absolutely love this cute hand print jellyfish craft. We made these to go on my sons door, which with all of the fun ocean crafts that we have been making lately is turning into something of an ocean display board. These little jellyfish look so cute and the best part is they’re super simple and easy so they’re perfect for preschool aged children to make aswell as older kids.
Here’s what we used.
Paint
Paintbrush
Marker pens
Sticker eyes
How to make our cute HAND PRINT jellyfish craft.
First we start off with the fun part! Take your paints and paint little ones hands in your chosen colours. Print the hand prints down with fingers spread apart and then put aside to dry.
Once dry, take your markers and draw several squigly lines down from between the four fingers to make the jellyfish tentacles. If your marker is thin you may need to go over the tentacles to thicken them up.
Optionally finish off by giving your jellyfish some eyes. We used eye stickers but if you dont have these you could simply cut some out of paper and use your markers to draw on the details. Aren’t they just the cutest?!
Crafting isn’t only for big kids. My 1yo loves to craft and paint and when my eldest is at school i love to sit down and spend time painting with her. Today was her grandmothers birthday so made this toddler finger-paint berry heart card, isn’t it sweet? the best part is that it can be as spotty and smudgy as your toddler chooses and it will still look adorable!
You will need
Red card
Green and Yellow Paint
2 Googly eyes
A marker pen
First you will need to make your card shape. Take a rectangle strip of card (we usually quarter a piece of A4 to make four cards) and fold it in half. Trim your card to make it into a square. Draw on the curves of your heart as you can see above. Cut out your heart shape.
Now its time to fingerpaint your card! Add some green fingerprints for leaves and some yellow fingerprints for seeds.
Finish off your the front of your berry heart card by giving him two googly eyes and drawing on a smiley mouth!
Now all that’s left to do is write your message inside and gift your heart to someone special.
When my little guy is painting he loves to mix the colours and see what he can create. So when he asked to do some painting the other day I thought I would come up with a fun colour mixing activity. Looking out the window at all the beautiful golden and burgundy leaves kicked my inspiration in to gear and between us we came up with the little Colour mixing finger-paint tree activity. Its a fun and simple craft for young children and we had loads of messy fun making it!
You will need
Paper Autumn coloured paints (we used; Red, yellow, pink, orange, brown and beige) A pen
To start your tree. Take a light coloured pen (we used yellow to blend with the tree) and draw a large circle to make the head of your tree. Take your Leaf colour paints and make several thick fingerprints within your circle.
This is the fun part! Take your index finger and mix your paints all together, stretching the colour out to the edge of your circle. When you’re happy with your tree, take your pen and draw the trunk of your tree.
As before, use your index finger to dot your darker colours inside your tree trunk.
and smush it all together!
My son then added some red spots to his tree. He couldn’t decided whether they were apples or blossom but either way I think its looks fab and really finishes off his picture!
Did you enjoy this Colour mixing finger-paint tree craft? Why not check out my super cute leafy hedgehog?