It’s finally my favourite time of year; spooky season! Our Halloween crafts are in full swing and we’ve been having so much fun making some spooky homemade decor. This cute paper plate pumpkin craft is so adorable and is easy to adapt for all age groups. Each paper plate turns out completely unique which makes these pumpkins perfect for a fun Halloween display board!
Here’s what you’ll need
Paper plates
Orange tissue paper
Coloured card (green, brown and black)
Scissors
Glue
How to make our paper plate pumpkin craft
First take your orange tissue paper and cut it into several small square pieces. Cover the paper plate in glue and then use the orange squares to cover the plate and give it it’s pumpkin colour.
Next it’s time to create your paper plate pumpkin’s design. Cut out the shapes of the facial features and glue them on to the front of the plate.
Finish off by cutting out a stalk and some greenery and gluing in down on the back to complete your paper plate pumpkin craft. Aren’t these just adorable?
My kids and I love seeing your finished designs, why not share them with us on Facebook or instagram? You can find the link to our socials at the bottom of the page!
I just love this adorable paper plate umbrella craft. With all the wet and windy weather that we’ve been having lately this was the perfect craft for us to gather around the Kitchen table and do! My kids had loads of fun making these and it was a great way to burn half an hour too.
First we started with the fun part – finger painting! Take a piece of paper and using finger paints design a backdrop, for example my kids made lots of spotty raindrops and some squiggly clouds! Once finished pop your backdrop aside to dry.
Take the paper plate and cut it in half . Cut a wiggly line into the bottom to make the shape of the umbrella. Now it’s time for decorating the umbrellas! My kids used Tissue paper squares with glue but you can use anything you like.
Once the back drop and umbrella are dry take a piece of coloured paper and cut out the shape of the umbrella handle. Glue the handle onto the umbrella and then the umbrella on to the backdrop! Aren’t these just adorable? They’re great as a supporting activity when learning about seasons or weather.
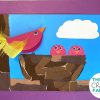
How adorable is this baby triceratops? My son is mad about all things dinosaur and he just loved making and playing with this little cute hatching dinosaur egg craft. We’ve added it to his dinosaur themed bedroom next and it looks fab!
First we started by making our dinosaur egg. To do this, take the paper plate and cut a zig zag line directly through the middle of it. Take the paints and sponge them across the eggs to decorate them – my kids loved this bit! Once they are finished pop them aside to dry.
Cut out a circle for the dinosaur’s body and then a slightly smaller one for it’s head (you may want to check that they fit the egg before continuing)
Cut out several colourful semi circles to make the triceratops’ frill and then glue them down in place around the top 2/3 of its head.
Now add the triceratops three pointy horns and a triangular beak
Then add two eyes to finish the triceratops’ head
Glue the head circle on to the body circle and then take one half of the dried paper plate egg and glue it onto the front of the triceratops as above. Cut out to little feet and stick them onto the front of the egg so that it looks as if it’s feet are popping out.
Take a split pin and secure the two halves of egg together at one corner. Now the egg can move and the baby dinosaur can hatch! once dry your hatching eggs are finished!
How adorable is this fluffy little paper plate sheep craft? It’s so easy and cheap to make and is great for keeping the kids entertained on rainy days like today! my 3yo loved sticking on the cotton wool balls and my nearly 6yo did an amazing job cutting out the shapes and making his own paper plate sheep.
Here’s what we used
Paper plate
Cotton wool balls
Black paper/card
Googly eyes
Scissors/glue
How to make this paper plate sheep craft
Start by covering the paper plate in glue and then covering it with the cotton wool balls.
Cut out a mushroom shape from the black card to make the sheep’s head. Glue two large Googly eyes onto the sheep’s face and then using your glue or some double sided tape, glue the sheep’s face on to the middle of it’s body.
Cut out two black rectangles for the legs and glue them onto the bottom of the paper plate. Once dry the sheep is finished and ready to display! This craft is great for grownups to make with toddlers and pre-schoolers!
Autumn is my favorite season and with it comes one of my favorites holidays – Halloween! The raincoats and scarves are already out which we’ve taken as a sign that its time to start making some homemade decorations for the spooky season. My kids aren’t really into trick or treating, they’d rather go to a Halloween party or just stay home, dress up and watch a movie which sounds perfect to me! One thing we do love to do together though is decorate the house. so today we’ve started making our decorations with this fun paper plate shape pumpkin craft! These are great practice for children like my daughter who are just learning their shapes.
Here’s what we used
Paper plate
Orange paint and paintbrush
Black/green/brown paper
Scissors
Glue
How to make a paper plate shape pumpkin
Take the paper plate and cover it completely in orange paint before popping it aside to dry.
From the black paper cut out several different shapes that can be used to make the pumpkins face. We used triangles, squares and circles. Glue the shapes down onto the paper plate to make the face.
Cut out and glue on a shape for the stalk and leaf then put to one side to dry. Once completely dry the paper plate pumpkins are ready to display!
We’d love to see what pumpkin designs your little ones make! Did you know you can now share them with us on Facebook?