I just love this adorable paper plate umbrella craft. With all the wet and windy weather that we’ve been having lately this was the perfect craft for us to gather around the Kitchen table and do! My kids had loads of fun making these and it was a great way to burn half an hour too.
First we started with the fun part – finger painting! Take a piece of paper and using finger paints design a backdrop, for example my kids made lots of spotty raindrops and some squiggly clouds! Once finished pop your backdrop aside to dry.
Take the paper plate and cut it in half . Cut a wiggly line into the bottom to make the shape of the umbrella. Now it’s time for decorating the umbrellas! My kids used Tissue paper squares with glue but you can use anything you like.
Once the back drop and umbrella are dry take a piece of coloured paper and cut out the shape of the umbrella handle. Glue the handle onto the umbrella and then the umbrella on to the backdrop! Aren’t these just adorable? They’re great as a supporting activity when learning about seasons or weather.
How adorable is this fluffy little paper plate sheep craft? It’s so easy and cheap to make and is great for keeping the kids entertained on rainy days like today! my 3yo loved sticking on the cotton wool balls and my nearly 6yo did an amazing job cutting out the shapes and making his own paper plate sheep.
Here’s what we used
Paper plate
Cotton wool balls
Black paper/card
Googly eyes
Scissors/glue
How to make this paper plate sheep craft
Start by covering the paper plate in glue and then covering it with the cotton wool balls.
Cut out a mushroom shape from the black card to make the sheep’s head. Glue two large Googly eyes onto the sheep’s face and then using your glue or some double sided tape, glue the sheep’s face on to the middle of it’s body.
Cut out two black rectangles for the legs and glue them onto the bottom of the paper plate. Once dry the sheep is finished and ready to display! This craft is great for grownups to make with toddlers and pre-schoolers!
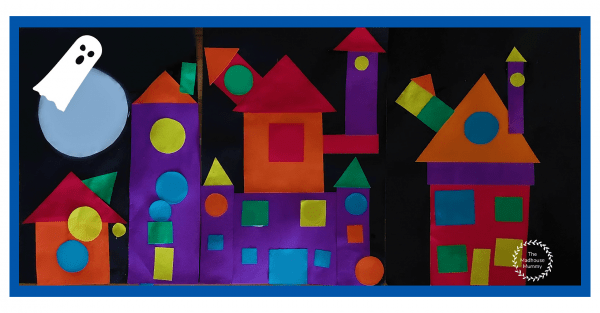
This ‘pick n mix’ kind of craft where you just pop everything in the middle and the kids go wild coming up with their own wild and wacky craft is always so much fun and is my favourite kind for pre-schoolers and toddler groups! Each design always turns out so unique and wonderful which makes this haunted house shape collage craft perfect for decorating Halloween themed displays boards.
Here’s what we used
Black, white and coloured paper
Markers
Scissors
Glue
Making a haunted house shape collage
To set this craft up we simply took our colored paper and cut out several different sized shaped from each color, then popped them in the center of table with a pot of glue.
The kids then picked out the larger shapes and began sticking them down to create the base of their houses.
They then added smaller shapes to make doors, windows and extra decorations!
once dry we framed their pictures and stuck them up on the kitchen door – don’t they look fab!
Autumn is my favorite season and with it comes one of my favorites holidays – Halloween! The raincoats and scarves are already out which we’ve taken as a sign that its time to start making some homemade decorations for the spooky season. My kids aren’t really into trick or treating, they’d rather go to a Halloween party or just stay home, dress up and watch a movie which sounds perfect to me! One thing we do love to do together though is decorate the house. so today we’ve started making our decorations with this fun paper plate shape pumpkin craft! These are great practice for children like my daughter who are just learning their shapes.
Here’s what we used
Paper plate
Orange paint and paintbrush
Black/green/brown paper
Scissors
Glue
How to make a paper plate shape pumpkin
Take the paper plate and cover it completely in orange paint before popping it aside to dry.
From the black paper cut out several different shapes that can be used to make the pumpkins face. We used triangles, squares and circles. Glue the shapes down onto the paper plate to make the face.
Cut out and glue on a shape for the stalk and leaf then put to one side to dry. Once completely dry the paper plate pumpkins are ready to display!
We’d love to see what pumpkin designs your little ones make! Did you know you can now share them with us on Facebook?
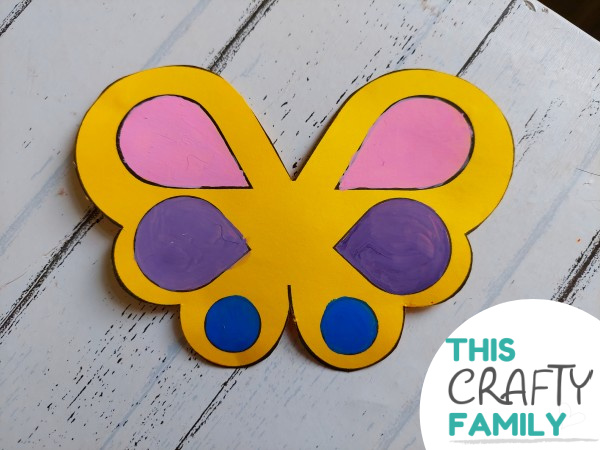
Create beautiful and unique butterfly designs with this adorable summer butterfly craft for kids!
We love a good summery craft and my kids had so much fun designing their own beautiful little butterflies. We used paints to decorate our butterflies but you and your kids can get as creative as you like! why not decorate them with some gluing and sticking? or how about using coloured pencils? Either way we just love seeing how your home crafting turns out – did you know that we are now on Facebook? You can share your photos with us there!
Take the lollipop stick and glue a large pom pom at one end. Cover the rest of the stick with a row of slightly smaller pom poms and set it aside to dry.
Take your free butterfly wings template and cut it out (as you can see we printed our template directly onto our yellow card but you can always just use the template to draw around). Once the wings are cut out use your markers, paints or embellishments to decorate them with.
One dry, take the pom pom covered lollipop stick. Twist a pipe cleaner securely around the body of the stick just below the butterfly’s pom pom head. trim the two ends of pipecleaner to the desired length before curling each end slightly to make the antennae. Glue on two googly eyes and optionally a mouth.
Stick the Butterfly’s pipe cleaner body down in place on its wings and leave until completely dried. The butterflies are then ready to show off and display – Aren’t they just the cutest!?
Please note this post may contain affiliate links. If you click on any of the affiliate links provided and make a purchase I receive a small commission at absolutely no extra cost to you. This helps me to keep this page up and running and provide free content.