These super cute Christmas wreath tree ornaments look amazing hung on the Christmas tree and only require 3 basic materials to make too. They’re perfect for at home crafting and for group crafting too!
Here’s what we used
Pipe cleaner
Christmas beads
String or ribbon
How to make our Christmas tree wreath ornaments
Start by taking a selection of beads and threading them onto your pipe cleaner until they cover just over half the length. My daughter has been learning patterns at school so we threaded ours in a repeating pattern!
Once you’re happy with your design, pull the ends around into a circle and twist them together
Fold each length of pipe cleaner into a loop and then twist them together in the middle to make a bow.
Take a length of string, thread it through the first bead on either side of the twisted pipe cleaner and then tie it into a loop. Your super cute Christmas tree wreath ornaments are ready to hang on the tree!
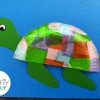
We had so much fun making this adorable paper plate mouse craft! They were easy enough for my little boy to make by himself and my toddler enjoyed making these with a grownup. I love a sweet and simple craft idea that can be adjusted so that both of my children can join in and this little craft was perfect!
Here’s what we used
Paper plates
Colored paint and paintbrush
Pom Pom
Pipe cleaner
Googly eye
Scissors
Glue
How to make a paper plate Mouse
Take the paper plate and coat it in the colored paint before putting it aside to dry.
Cut out two equal circles to make the ears, glue one to the front and one slightly further forward on the back. Glue down a Googly eye and a pom pom for the nose.
Cut out three thin strips of paper for the whiskers and glue them down in a triangular shape. Then take the pipe cleaner and twist it around a pencil leaving a small length at one end straight. Use this length to glue the pipe cleaner tail on the inside of the paper plate. once dry your paper plate mouse is finished!
How cute is this paper flower pot craft? We had so much fun making these to brighten up our living room! They look fab on display and make great handmade gifts for mothers day, valentines day, birthdays, teacher gifts and more!
Here’s what we used
Coloured paper
Glue
2 Paper cups
Bamboo skewer
Paint & paintbrush
Scissors
A button
How to make this cute paper flower pot craft
First start by painting one of the cups to make the plant pot. Then take the second cup and chop off a small section from the bottom. Paint this section the color you want your flower to be planted in; we used brown for soil. Then finally take your skewer and color it green to make the stem. pop them aside to dry – We used a small piece of polystyrene to stand our stem up in whilst it was drying.
Take the colored paper that you will be using for the flower head and cut it into 6-8 equal strips of paper. Glue your strips together at the center to form a sun shape as in the above picture.
Take the end of each strip and glue it down at the center
of the flower.
Continue this process with all of the strips and then glue down the button to make the center of the flower.
Attach your painted stem to the back of your the flower. Then cut out a strip of green paper and glue the two ends together to make a leaf. Glue the leaf onto the stem and repeat as desired.
Glue the end piece of cup down inside the plant pot cup so that the base is facing upwards. Pierce the flower stem through the upturned cup and then through the base of your plant pot cup so that it stands stiff. TIP: if your cup has a flat base rather than a raised base then a lump of blu tack in the bottom of the plant pot cup will give the stem something to stick in to. Add any extra decoration and once dry the flower is ready to display or gift!
After making our polymer clay lollipops I thought that I would upload these simple pipe cleaner lollipop ornaments too. Clay is fab and great for crafting but it’s something that until recently we never really kept in the house, plus it can be quite expensive if you buy the better brands. Pipe cleaners however are so cheap and easy to find (most pound shops sell them) so I thought they would make for a great alternative option. To be honest I’m not even sure which ones I prefer, they both look super sweet and perfect for a Willy Wonka themed Christmas! These little cuties only cost a few pence to make and once you get the hang of them they’re quick to make too, my 4 yo managed to master twisting and rolling them after a few tries!
Here’s what we used
Pipecleaners
Bows
Yarn
Scissors
Glue
How to make our pipe cleaner lollipop ornaments
Take your chosen pipe cleaners and twist them together at one end.
Twist the pipecleaners around each other all the way along to give this awesome stripy effect.
Take one end of your pipecleaner and begin rolling it around into a spiral, ensure that you pull it tight enough to hold position. Once you get to the end wrap the loose end around the previous ring which it is next to.
Add a small length of pipe cleaner to the back of the lollipop to make the stick. Finish off your sweet decoration by adding a bow to the bottom of your lollipop spiral.
If you would like to hang your lollipop on the tree, simply add some yarn to your decoration. We found that the easiest way was to glue a loop to the back but you could always thread it through the top ring of your spiral and then tie it into a knot! Aren’t these just the sweetest little sweets?
How adorable are these little Popsicle stick bumble bees? over the last couple of weeks my little guy has been learning about patterns at school and has since been making patterns with almost everything he finds. This afternoon he came home from school and emptied out the entire box of pom poms (we’re talking like 500 of the things) on to the kitchen table and began organizing them into patterns. He spent ages sat there coming up with different color combos so i suggested that we used the pom poms to make a patterned themed craft and the first patterned thing we thought of were bumble bees! We get a lot of them in our garden during the summer and he loves to watch them. I personally really like these and my little guy now has them stuck up in his bedroom window.
Here’s what we used
Yellow and black pom poms
Lollipop stick
White and black pipe cleaners
Googly eyes
Scissors
Glue
How to make our popsicle stick bumble bees
Cover the lollipop stick in glue and then stick on the pom poms in an alternating yellow/black pattern with a large pom pom for the head. Leave the pom poms to dry in place.
Now take a white pipe cleaner and twist it into a figure of eight to make two wings. Attach your wings onto your lollipop stick between the pom poms by either twisting it on or gluing it like we did.
Cut a length of black pipe cleaner and twist it evenly onto your Popsicle stick, just behind the head pom pom. Then curl each of the two ends to make two antennae. Finish off this cute little Popsicle stick bumblebee craft by adding two googly eyes!