Please note that this post (cute paper plate jellyfish) contains amazon affiliate links, this means that if you make a purchase via the links provided I may make a small commission. This comes at no extra cost to you and helps cover the running costs of this blog.
If you’ve followed the blog at all you will know that my son is mad about all things under the sea. He loves learning about the ocean environment and its inhabitants though his books and we read some of national geographic kids ultimate oceanpedia almost every single day. He loves watching documentaries together too and more often than not hes the one teaching me something new! It was actually him who gave me the idea for this cute paper plate jellyfish when he said how he thought the bubble wrap from our parcel looked like a jellyfish. I’d already planned to get some paints out for him and his sister so we merged the two ideas and came up with these little cuties!
Here’s what we used
A good sized paper plate
Coloured paints
Paintbrush or sponges
Bubble wrap
Paper (we used pink, black and white)
Scissors
Glue
How to make a cute paper plate jellyfish.
First take your paper plate and cut a wavy line down through the center. You can make two jellyfish from one paper plate.
Take one half of your paper plate and use your sponges and paint to decorate it. When you have finished, pop your paper plate to one side to dry.
Whilst your paper plate is drying, cut out some strips of bubble wrap and lightly paint the bubble side. Put these aside to dry with your plate.
Once your jellyfish head is dry you can give your jellyfish a face. To make our eyes we used a large white circle for the outer eye, a slightly smaller black circle for the pupil and a small white circle for the light spot. For the mouth we just cut out a small semi-circle piece of pink card.
Finish off your jellyfish by gluing your dried bubble wrap strips centrally on the back of your paper plate.
Your adorable paper plate jellyfish craft is finished! Aren’t they just the cutest? They look fab on walls, display boards and hung up from the ceiling.
Todays craft has been so much fun, how adorable are these DIY ocean squid windsocks? My son is still crazy about all things under the sea and has been particularly fascinated by one creature for ages. It’s easy to see why he finds squids so interesting, there are many different types and each one looks so odd and unique. He loves learning about the different types and Weve been watching some of national geographic’s squid videos on YouTube this morning. So we thought perhaps it might be nice for us to make a squid themed craft for him to play with in the garden.
Here’s what we used
Coloured card
Scissors
Glue
Crepe paper
Black marker
How to make our DIY ocean squid windsocks
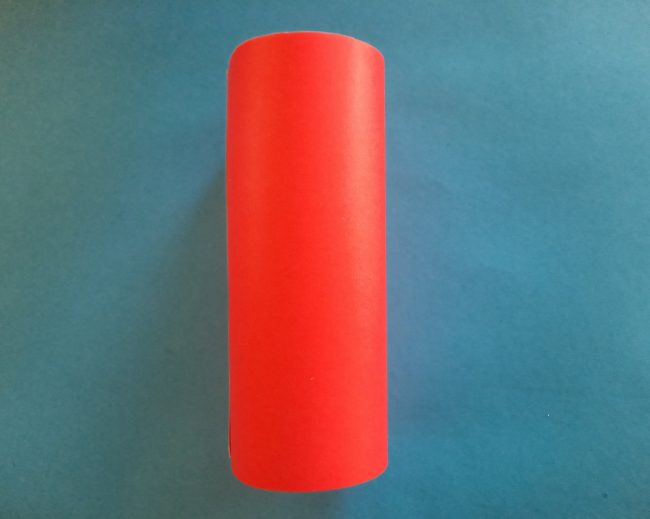
First you will need to take your coloured card. Line one end with glue and then roll it round to make a tube
Use your scissors to round the top end of your tube into a curve.
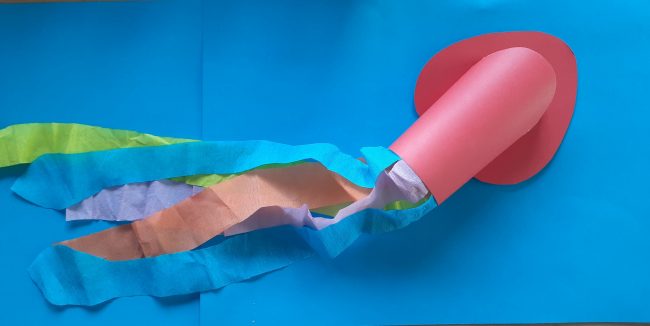
Place your tube onto another piece of coloured card. Draw a raindrop shape around your tube so that it starts around halfway up and extends a few cm above your tube. Cut out your shape and glue it in position as you can see a above
Cut out some strips of crepe paper and glue them around the inside of your tube so that they hang freely down. You’ll notice that we made two of the front strips slightly longer and on these we cut out some rounded shapes to make the suckers.
Cut out two white circles for the eyes and then use your black marker to draw on the pupils. Glue your eyes to your tube. So that you can hang your squid up, you will need to make a hole on either side of your squid’s body. Cut off a length of string and then thread each side in through one of the holes and in to the centre. Tie the two loose ends together inside your tube.
.
To finish off our squid we added a dab of glue at the bottom of each of side of our rainbow shape. We then folded it inwards so that it stuck to our tube giving it more of a curve and making it more secure.
All that’s left to do now is to wait for a windy day so that you can see your squid in action! Aren’t they just the cutest?!
Please note this post may contain affiliate links. If you click on any of the affiliate links provided and make a purchase I receive a small commission at absolutely no extra cost to you. This helps me to keep this page up and running and provide free content.