After a couple of weeks off, we’re back again with another fun and easy spring craft idea! I just love pom pom crafts. When i was little i would sit with my nan for hours making Pom poms to go on little bobble hats for her knitted snowman teddies. We used to use the little cardboard circles, they were so fiddly and we’d spend hours threading them in and out. Thankfully now we know a few easier ways to make pom poms and I’m so pleased how this little pom pom spring chick craft turned out, They were fab as little Easter decorations too!
Here’s what we used
- Yarn
- Pom pom maker (optional)
- Scissors
- Glue gun
- Felt
- Ribbon bow
- Googly eyes
How to make our pom pom spring chick craft

First you will need to start by making two different sized pom poms. You can find a guide on how to make pom poms here.

Once you have your two pom poms. There are are two ways in which you can do this. For ours we simply used the long strands of tying yarn to tie them tightly together with a double knot before trimming them to length.
The other way you can secure them together is by trimming the tying yarn and then using a glue gun to stick the two pom poms together.

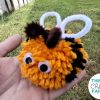
Next it’s time to give the pom pom chick a face. For ours we glue on two googly eyes, a felt beak and a pretty ribbon bow.

Finish off by gluing on two felt wings and two little feet. Once dry the chick is finished, isn’t he a cutie? Perfect as an Easter gift, handmade toy or to decorate an Easter bonnet!