These adorable spiders are so quick and easy to make and are great as homemade halloween decor hung from the ceilings or even just as a cute incy wincy spider inspired craft!
I love to see your home creations, did you know I’m now on Facebook and instagram? You can share them with me there!
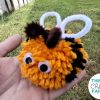
Here’s what you’ll need
1 large Pom Pom
1 small Pom Pom
4 pipe cleaners (depending on the size of the pom poms you are using you may be able to use 2 pipe cleaners and chop them in half)
Two Googly eyes
Glue gun
How to make our adorable Pom Pom spider
Take your small pom pom (which will be the spiders head) and use a small blob of glue to attach it to the larger pom pom which will be the spider’s body.
Glue your pipe cleaners centrally across the underside of the spiders belly so that you have 4 legs sticking out each side.
Attach two eyes to the front of your spiders face and optionally add any details such as fangs on a mouth.
Finally bend the pipe cleaners upwards and then outwards to create the shape of the spiders legs. Aren’t these little Pom Pom spiders adorable? We added some stretchy elastic to the back of ours to make a web for the kids to bounce him up and down with!
Take your roll and chop it down to your desired height. Next take your pink card and cut out a strip the same height as your roll and wide enough to wrap completely around it. Glue the card around the roll.
From the same colour cut out two large pig ears and then cut two slightly smaller inner ears from a different shade of pink. Glue the pieces together to make the ears and then stick them in place inside the top of the roll.
Add two eyes on the front of the roll, just below the ears
Now make an oval snout and add two pink nostrils. Glue it on to the middle of the pigs face and use your marker to give the pig a mouth
Cut out a long thin strip with a point at the end to make a tail. Wrap the tail around a pencil to make it curl and then glue it onto the back of the roll to finish your pig! Isn’t he cute?
This adorable paper cup giraffe puppet is not only fun and easy to make but can also provide hours of fun imaginative play too. we made ours using card scraps and my daughter just loves him!
Here’s what we used
Coloured card (yellow, orange and black)
Coloured paper (orange)
String
2 Paper cups
Googly eyes
Scissors
Glue
How to make our paper cup giraffe puppet
Take your yellow card and cut out two large outer ears and then two smaller inner ears from the orange. Glue the pieces together to make the ears and then fold a small tab at the bottom of each ear and glue it in place inside the paper cup. next cut out two long giraffe horns and glue them in place between the ears as above.
Add two Googly eyes to the top of the head paper cup and two round black nostrils to the base. Then cut out several orange paper splotches and glue them all over both cups of the giraffe.
Next you’ll need to make five paper springs (4 legs and 1 neck). To make a spring take two equal length strips and glue them together at a right angle. Take turns folding the strips one over the other and then secure the end with glue.
Next cut out four round card circles for the feet and glue one to the end of each spring leg.
Attach the head and body together using a spring as above and then glue the 4 legs in place on the underside of the body cup.
To finish your paper cup giraffe puppet cut a fair length of string and glue one end just inside the rim of the head cup and the other inside the body. Once dry your adorable giraffe is finished and ready to dance!
This adorable handprint flower pot art is so simple to make and is a perfect keepsake to gift for birthdays, Mother’s Day, Valentine’s Day and many other occasions!
Here’s what you will need
Coloured paper
Scissors
Glue
Pencil
How to make our handprint flower vase art
Start by drawing around little one’s hand and then cutting out 3-5 handprints from your different coloured paper.
Next cut out an equal amount of green paper stems to match the amount of handprint flowers. Glue the stems onto the back of the flowers. Then glue the flowers down onto your paper with all the stems directing towards the middle of the page
Cut out the shape of your flower pot and add any extra decoration you would like. We used some ribbon to make a bow on ours! Glue the flower pot down at the bottom of your page across the stems.
Finish off by adding a few paper leaves and any optional extra message and your picture is done and ready to display once dry! Don’t these look adorable?
This cute and simple to make Easter bunny craft idea is perfect for both kids and grownups alike!
You will need
Clean tp roll
Paint
Coloured card
Scissors
Glue
Googly eyes
Pom pom
A pen
How to make this adorable Easter bunny craft idea!
Take your toilet paper roll, cover it in your chosen colour of paint and then pop it aside to dry.
Cut out two rounded outer ears and then two smaller coloured inner ears. Glue the inner ears onto the outer ears and then once dry stick the ears in place on the inside of the toilet roll tube.
Cut out two large feet then cut out the small circles and an oval shape from your colourful paper and stick them onto the feet to make the footprints.
Glue two large googly eyes onto the front of the roll and then add a small pom pom nose between the eyes.
Use a pen to draw on the rabbit’s mouth and whiskers and optionally stick on a small white rectangle for the teeth.
Finally add a fluffy pom pom to the back and your adorable Easter bunny craft is finished and ready to display or gift!
Please note this post may contain affiliate links. If you click on any of the affiliate links provided and make a purchase I receive a small commission at absolutely no extra cost to you. This helps me to keep this page up and running and provide free content.