These lollipop stick pals are our favorite kind of craft, each child creates their own designs and at the end you have a variety of different ideas – each one awesome and unique! The kids loved making these and were using them to put on puppet shows from under the table before finally deciding to use them as homemade bookmarks. This little craft is great for groups, simply put out a variety of materials for the children to use!
Here’s what we used
Wide lollipop stick
Paint or felt tip pens
Googly eyes
Coloured paper
Scissors
Glue
Optional decoration bits and pieces
How we made our lollipop stick pals
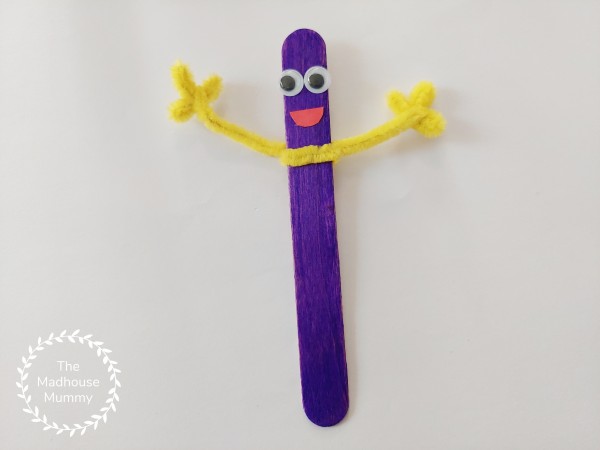
Using pens or paint colour in the lollipop stick and leave it to dry.
Take the pipe cleaner and shape the ends as desired to make the hands before twisting it on to the lollipop stick.
To make the hands for this bookmark we bent three bumps into the end of the pipe cleaner then twisted the length of the pipe cleaner between one of the bumps to secure before shaping with our hands. We then repeated this on the other side.
Add some fun facial features to the top of the lollipop stick bookmark
And finish off by adding any extra customisations such as hats, clothes or any other decorations!
We’d love to see how your little one’s lollipop stick pal turns out. Did you know you can share them with us on Pinterest or Facebook?
These adorable little bookworm bookmarks are so sweet and simple. They’re perfect for young readers or as a handmade gift for loved ones! We originally made one for Granny but i liked them so much that my little guy wanted to make one for me too and aren’t they just the sweetest?
Heres what we used
Coloured card
Scissors
Glue
Googly eyes
Pen
How to make these bookworm bookmarks
Start by cutting out the rectangle shape of your bookmark. Then take your scissors and cut out 6-8 little circles. Glue them into an zig-zag pattern to make the bookworm’s body.
Add a face to your bookworm. For ours we added two googly eyes, a paper mouth and two antennae. Once the eyes had secured a little we used a pen to draw around them and add some glasses.
Next it’s time to make book. Cut out a rectangle strip of card that is the same height as your bookmark and then fold it in half to make the book. Trim the width as necessary. Then cut out a slightly smaller rectangle from your white paper and glue it into the centre of the book to make the pages. Use a marker to add a special message.
Finish off by adding any optional decoration and your bookmarks are ready to use or gift!
How cute are these little Triceratops dinosaur corner bookmarks? My son is mad about dinos but we always find it hard to come up with dinosaur themed crafts. So we were pretty pleased with these little guys. I’ve even found that my son is more interested in reading his books too – simply because he wants to use his new bookmarks!
You will need
Coloured crafting paper
Scissors
Pencil
Sticker eyes (optional)
Glue
First you’ll need to start by folding your bookmark. If you haven’t made one before you can find an easy photo guide here.
To make the frill, cut out some semi circles and glue them along the inside of your bookmark. You should need between 4 and 6 depending on how big you cut them.
Cut out a rounded yellow triangle for the beak and glue it down on the outer point of your bookmark. Then, give your triceratops two eyes. We used eye stickers but if you don’t have these you could cut out two white paper circles and draw the details on – or just draw them straight on to your bookmark!
Finish off your triceratops by adding a curved horn to each side of his head and a straight horn to the upper edge of the beak. Once dry, your super roarsome triceratops bookmark is finished and ready to be used!
Please note this post may contain affiliate links. If you click on any of the affiliate links provided and make a purchase I receive a small commission at absolutely no extra cost to you. This helps me to keep this page up and running and provide free content.