How cute is this tp roll ballerina puppet craft? We really enjoyed making these and the kids had so much fun twirling them around to music and making their own ballet shows!
Here’s what we used
Cardboard tp roll
Coloured card and paper
Markers
Scissors
Glue
Tape
String
How to make our tp roll ballerina puppet craft
Take a skin tone coloured piece of paper and cut out a strip that’s long enough to wrap around the paper roll and approximately 1/3rd the height of it. Glue the strip around the top of the paper roll to make the princess’ head.
Cut out a second strip of colored paper to cover the bottom 2/3rds of the roll and glue it on to the paper roll to make the princess’ dress.
Now cut out a strip of paper and style it as desired to make the hair. We used a long triangular shape to make this ballerina’s fringe.
Use your markers to add a face to your tp roll ballerina.
Cut out a strip of coloured paper and make several snips into the bottom of the strip before curling the ends to make the tutu. Glue the tutu around the toilet roll.
Next cut out four equal strips of paper and fold them using a fan fold (one way and then the other) to make the arms and legs. Glue them into place on the toilet roll.
Cut out two hands and two feet and glue them onto the end of the arms/legs.
Optionally glue the ballerinas hands together above their head and then take a good length of string and attach either end to one of their hands. once dry your ballerina is ready to be played with!
Spooky season is well under way in our house, we haven’t sorted out our costumes yet but we’ve been super busy making some fun homemade Halloween decorations. Today I wanted to share with you these cute little toilet roll ghosts! They’re so easy to make and look fab too.
Here’s what we used
TP roll
White paint and paintbrush
Black and white paper
Sticker eyes
Tissue paper
Scissors and glue
How to make our toilet roll ghosts!
Take the tp roll and cut a wavy edge into one end of it before painting it white and popping it aside to dry.
Once the toilet roll has dried, add two eyes and a mouth to the front.
Cut out two arms and glue them down in place on the back of the toilet roll ghost.
Cut out 3-5 long strips of tissue paper and glue them around the inside of the bottom of the toilet roll tube.
Optionally add some string to the top of the toilet roll and the ghost is ready to display!
Tomorrow is the first of October and that means it’s officially the start of spooky season! We can’t wait to start decorating the house and today we’ve been busy making these fun tp roll Halloween bats which we’re going to turn into a spooky garland for the conservatory. We still have plenty left to make on the weekend when my son is home but I think it’s going to look amazing!
Here’s what we used
Tp roll
Coloured paints and paintbrush
Coloured card
Pipe cleaner
Coloured paper
Scissors
Glue/tape
How to make these TP roll Halloween bats
Take the toilet roll and cover it in the chosen colour of paint before popping it aside to dry.
Cut out two triangle ears and glue a slightly smaller triangle onto each one to make the inner ears. Once the tp roll is dry attach the ears inside one end of the roll.
Cut out two white circle eyes and then glue a circle pupil onto each one. Glue the eyes on to the front of the bat then finish the face by adding a mouth and two pointy triangle fangs.
Next, Cut out the shape of the bat’s wings and stick them onto the back of the toilet roll bat.
Finally, Take the pipe cleaners and twist three loops in one end of each to make the feet. Stick the other end of the pipe cleaner leg down in place inside the bottom end of the toilet roll. Once dry your bat is ready to display!
We’re carrying on the whale theme today with this adorable toilet roll humpback whale craft! These little under the sea themed cuties were so much fun to make and my little boy as a huge lover of all things do with the ocean is just besotted with them!
They’re really simple and easy to make so why not give them a go with your little ones! We’d love to see how they turn out – did you know you know we now have a Facebook page? You can share them there!
Here’s what we used
Toilet roll
Blue, pink and white paint
coloured paper
Scissors
Paintbrush
Googly eye
Glue
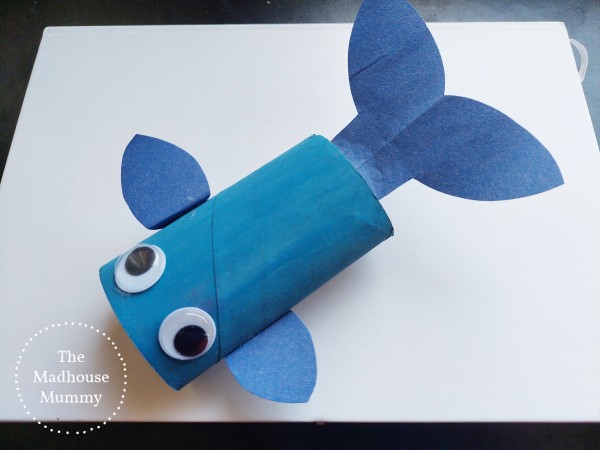
How to make a toilet roll humpback whale
Take the toilet roll and paint the inside of one end pink. On the outside of the roll paint one half blue/grey and the other half white before popping aside to dry.
Cut out a whale’s tail shape and glue it in position on the inside of the paper roll (at the opposite end to the pink section) Next cut out two leaf shape flippers and fold a small tab at the end of each one which you can then use to glue them on either side of the tp roll body.
Once the paper roll is dry, take the black marker/crayon and draw several lines along the white section of the body to create the whale’s throat pleats.
Glue a googly eye on either side of the whale and optionally you could always add a little dorsal fin using the same method as with the fins. Once totally dry and secure the toilet roll humpback whale is finished and ready to play with or display!
Please note this post may contain affiliate links. If you click on any of the affiliate links provided and make a purchase I receive a small commission at absolutely no extra cost to you. This helps me to keep this page up and running and provide free content.