This super cute pom pom reindeer ornament is so simple to make and looks adorable too! it’s never too early to start Christmas crafting, We’ve had a quiet couple of days at home to try and get over a cold and to keep ourselves busy we’ve been bust trying out our new pom pom makers! i just love how this reindeer turned out and were currently in the process of making each of Santa’s reindeer as part of a cute Christmas display that we have planned. If you and your kids have go at making one we’d love to see how it turned out, did you know we’re now on Facebook? you can share pictures with us there.
Here’s what we used
Pom pom maker (optional)
Brown yarn
Brown pipecleaners
Googly eyes
Red pom pom
Tacky glue/glue gun
How to make a pom pom reindeer ornament
Start by making a large brown pom pom. If you haven’t made one before you can find a quick guide here. You don’t need a pom pom maker to make a cute pom pom!
Tie a yarn loop and glue it down into place inside the top of the pom pom
Take a pipecleaner and fold it in half to create the top antler. Twist it secure about 2-4cm from the bend. Pinch a second antler on either side and twist them together at the base to secure. Part the yarn of the pom pom and glue the antlers into place either side of the loop at the top of the head
Glue on two Googly eyes and a pom pom nose and your pom pom reindeer ornament is finished!
After a couple of weeks off, we’re back again with another fun and easy spring craft idea! I just love pom pom crafts. When i was little i would sit with my nan for hours making Pom poms to go on little bobble hats for her knitted snowman teddies. We used to use the little cardboard circles, they were so fiddly and we’d spend hours threading them in and out. Thankfully now we know a few easier ways to make pom poms and I’m so pleased how this little pom pom spring chick craft turned out, They were fab as little Easter decorations too!
Here’s what we used
Yarn
Pom pom maker (optional)
Scissors
Glue gun
Felt
Ribbon bow
Googly eyes
How to make our pom pom spring chick craft
First you will need to start by making two different sized pom poms. You can find a guide on how to make pom poms here.
Once you have your two pom poms. There are are two ways in which you can do this. For ours we simply used the long strands of tying yarn to tie them tightly together with a double knot before trimming them to length.
The other way you can secure them together is by trimming the tying yarn and then using a glue gun to stick the two pom poms together.
Next it’s time to give the pom pom chick a face. For ours we glue on two googly eyes, a felt beak and a pretty ribbon bow.
Finish off by gluing on two felt wings and two little feet. Once dry the chick is finished, isn’t he a cutie? Perfect as an Easter gift, handmade toy or to decorate an Easter bonnet!
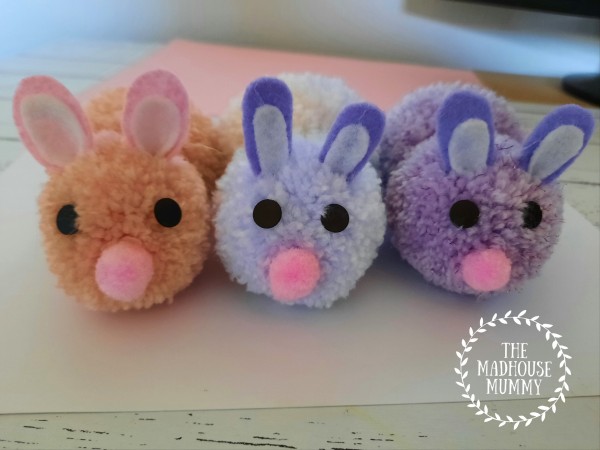
How adorable are these little pom pom Easter bunnies – we just love them!
Spring is fast approaching and Easter is not far behind it! These adorable little pom pom bunnies are one of my favorite crafts to make. I’ve slightly adjusted our normal design to make it easier for the kids and to suit the materials in their craft room but we think they are adorable. Ideally you want a glue gun to ensure the features are well stuck so this craft is perfect for children to make with a grownup. These adorable bunnies are so simple to craft and make a fab handmade Easter gift.
Here’s what we used
Pom pom makers (optional)
Yarn
Googly eyes
Small pom poms
Coloured felt
Glue gun (White glue does work but takes longer to dry!)
Scissors
How to make these adorable pom pom Easter bunnies
To start you will need to make a pom pom for the body and a slightly smaller pom pom for the head, ensure you leave the tail from your tying yarn long. If you haven’t made pom poms before you can find a guide here for how to make pom poms using a maker and a guide on how to make pom poms using only fingers!
Once made, Take your two pom poms and tie them tightly together using the lengths of your tying yarn. We like to double knot ours two times just to make sure they’re secure. Now take the scissors and trim the pom poms to the desired shape and fluffiness!
From the felt cut out two little bunny ears and then glue them in place deep inside the pom pom.
Glue on two little eyes and a nose.
Tip: for our bunny’s eyes we snipped open some googly eyes and used the black discs from inside!
Add a little pom pom tail to the back and once dry your little Easter bunny is finished!
How cute are these yarn wrapped hearts – Perfect for gifting!
It’s a little bit late to be sharing these for valentines day but we made them a couple of days ago and I think they are just too cute not to share! These little hearts are so sweet and fun to craft and are fab as little handmade gifts for children to make and gift for valentines day, mothers day, fathers day, birthdays and much more. The best part is that they’re so simple and quick to make too!
Here’s what you’ll need
A piece of cardboard (an old box will do!)
Yarn
Stapler or tape
How to make these yarn wrapped hearts
Take a piece of old cardboard and cut out the base shape of your heart. Attach the end of the yarn onto the heart using either tape or staples.
Wrap the yarn around the heart several times until you get a nice thick and puffy heart shape. Don’t worry if the yarn slips during the first couple of rounds, it gets easier as the heart gets bigger and you have more yarn for it to catch on. Once you’re happy with the size of the heart, snip off the yarn and tie your loose end around one of the strands on the heart before gentle tucking the loose end into the heart.
To use the yarn heart as a hanging ornament simply cut out a length of yarn, thread it under the yarn at the top center of the heart and tie it into a knot.
We use a lot of pom poms in our crafting, they’re just so much fun! We also have a basket of them on the side which the kids use for pretend snowball fights. They’re so versatile and so easy to make too, so I thought I would show your our favorite 2 ways to make perfect pom poms!
Method 1 – using a pom pom maker
Pom pom makers are our go to when we want perfect pom poms. This brand in particular is great especially when crafting with kids. They’re nice and chunky so are easy to grip and the ridges are a helpful guide as to when the pom poms are ready to snip. if you want to spend a little i highly recommend these clover pom pom makers (availabe here for our American friends) – there is a very good reason why they’re so popular!. We find that these are the best way to get perfectly round and fluffy pom poms but if you’re looking for a fast and free way why not check out method 2 – finger pom poms!
Take your yarn and wrap it around one side of the pom pom maker. Continue wrapping it around until its even all the way across. This particular brand of pom pom maker is super handy because you’ll know its ready when the ridges are totally rounded. But otherwise you can just adjust your yarn to your desired thickness – we usually do 3-4 layers when using dk yarn.
Repeat the previous step on the the other side of the pom pom maker.
Place the scissors inside the gap on the edge of the pom pom maker. Slowly snip all the way around both edges making sure you hold the pom pom maker together securely.
Take a separate length of yarn, slot it through the edge of the pom pom maker then pull it into a taught knot. Bring the two ends of yarn around to the other side of the pom pom maker and tie it into a double knot to secure.
Pull open the two arms of the pom pom maker and separate the two halves. Remove the pom pom, fluff it up, then take the scissors and trim it down removing any stray ends. Your perfect pom pom is finished! These pom pom makers are fab, we love using ours.
Method 2 – making pom poms using fingers.
Wrap the yarn several times around the middle three fingers (you can adjust the amount of fingers you use to alter the sizes).
Once you’re happy with the thickness of your yarn, carefully slip if off of your fingers and onto the table. Take a length of string and tie it around the centre of your entire yarn, flip the pom pom around and tie it on the other side in a double knot to secure.
Pop your scissors into the edge of your pom pom and slowly snip the loops open at their central point. Fluff up your pom pom.
Take your scissors and snip all around your pom pom until you are happy with it. Though the pom poms don’t turn out quite as perfect looking this way they are still super cute, plus its fast and free!
Please note this post may contain affiliate links. If you click on any of the affiliate links provided and make a purchase I receive a small commission at absolutely no extra cost to you. This helps me to keep this page up and running and provide free content.