These cute popsicle stick Christmas tree ornaments are so simple and easy to make and the look fab hanging on the Christmas tree too!
We just love how bright and colourful these look when they’re covered in Pom Pom baubles but you could decorate yours with anything you like! We love to see your creations, you can share them with me on social media; you can find the link to our Facebook and instagram at the bottom of this page.
Here’s what we used
Popsicle sticks
Acrylic paint pens (paints will work great too!)
Pom poms
Glittery foam
Ribbon
Scissors
Glue/glue gun
How to make our popsicle stick Christmas tree ornaments.
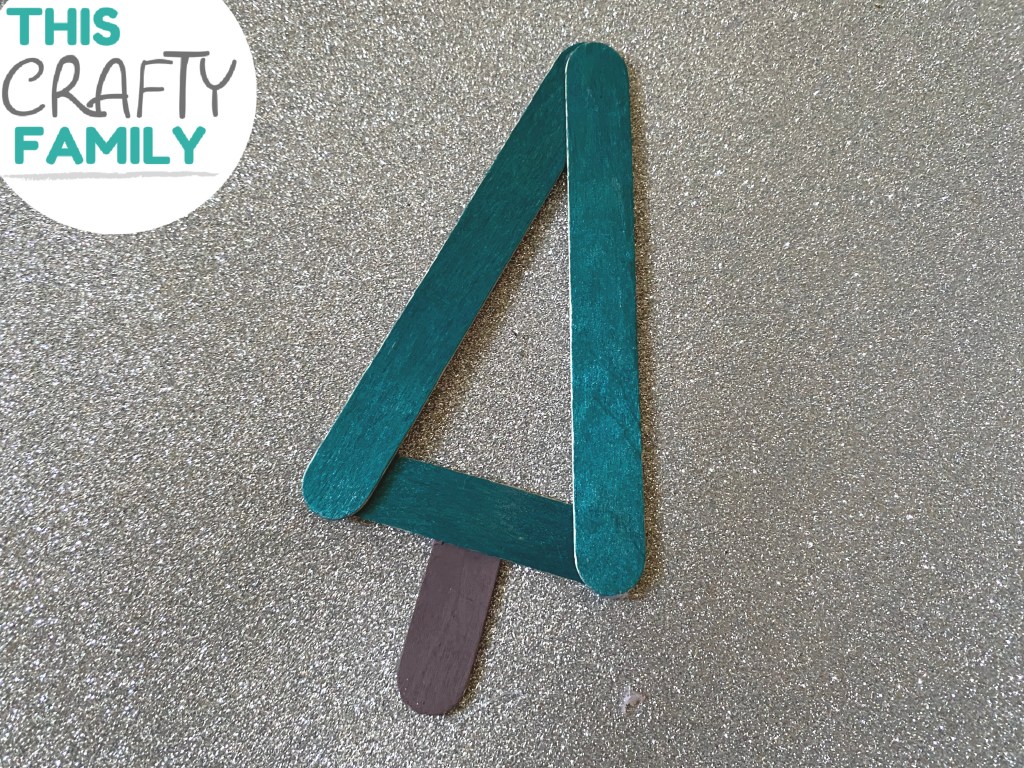
Start by taking your popsicle sticks and cutting them to the sizes that you can see above. You’ll need two full length sticks and one stick just over half the size with the ends cut to make the tree and an end section of stick to make the trunk. Then use your paints or markers to colour in the sticks before popping them aside to try.
Once your sticks are dry take the two full length ones and glue them together in a point, glue the shorter stick across the bottom to make the triangle shape of the trees and then finally add the final stick at the bottom to make the trunk.
Next decorate your popsicle tree ornament, we used colourful Pom Poms to make baubles but you can use anything that you like!
Cut out a glittery star for the top of the tree and stick it down in place
Finally tie a length of your festive ribbon into a loop and glue it down on the back of your ornament so that it can be hung on the tree. Once dry your ornament is ready to display! Aren’t these just the sweetest?
I really can’t believe how fast Christmas is rolling around this year, it seems as if the last one has only just been and gone. I think we’re all expecting this one to be a bit different from the normal with everything that’s going on in the world right now. Our normal Christmas day is a big family event but its looking like it may be a smaller one this year. Its a real shame but at the end of the day we all have to try and do what we can to keep ourselves and others safe. Personally we’re still determined to make the most of it and i can’t wait to decorate our house up like a grotto with all of our handmade crafts and décor, just like these yarn weaving Christmas tree decorations – perhaps we might even put it all up a little earlier this year!
Here’s what we used
4 green (or painted green) popsicle sticks
Green yarn
Silver card
Scissors
Glue gun (pva does work but requires a lot more time)
Optional pieces to decorate with.
How to make our yarn weaving Christmas tree decorations
Take three of your popsicle sticks and glue them together at one end to form an arrow shape then leave your sticks to dry. I would recommend using a glue gun for the best results.
Take the yarn and tie the loose end onto one of your sticks as close to the point as possible. Begin weaving your yarn through the sticks in an over, under pattern as above. You can just tuck the lose end of your knot into the weave to hide it.
Holding your yarn tight, push the woven yarn upwards to remove any gaps.
Repeat this process until you near the bottom of you tree. Once you are happy, chop your yarn to length and secure the lose end on the back of your tree by sticking or tying it.
Take your last popsicle stick and glue it stretching from the bottom of each side popsicle stick. Add a little star to the top and it really starts to look like a festive Christmas tree!
Finish off by decorating your tree and attaching a loop to the back by either tying or gluing it. Once dry the Christmas tree decorations are ready to display!
How adorable are these little Popsicle stick bumble bees? over the last couple of weeks my little guy has been learning about patterns at school and has since been making patterns with almost everything he finds. This afternoon he came home from school and emptied out the entire box of pom poms (we’re talking like 500 of the things) on to the kitchen table and began organizing them into patterns. He spent ages sat there coming up with different color combos so i suggested that we used the pom poms to make a patterned themed craft and the first patterned thing we thought of were bumble bees! We get a lot of them in our garden during the summer and he loves to watch them. I personally really like these and my little guy now has them stuck up in his bedroom window.
Here’s what we used
Yellow and black pom poms
Lollipop stick
White and black pipe cleaners
Googly eyes
Scissors
Glue
How to make our popsicle stick bumble bees
Cover the lollipop stick in glue and then stick on the pom poms in an alternating yellow/black pattern with a large pom pom for the head. Leave the pom poms to dry in place.
Now take a white pipe cleaner and twist it into a figure of eight to make two wings. Attach your wings onto your lollipop stick between the pom poms by either twisting it on or gluing it like we did.
Cut a length of black pipe cleaner and twist it evenly onto your Popsicle stick, just behind the head pom pom. Then curl each of the two ends to make two antennae. Finish off this cute little Popsicle stick bumblebee craft by adding two googly eyes!
When it comes to the holidays we love to have as many of our decorations handmade as we possibly can. so naturally with Halloween right around the corner we’ve been trying to come up with as many fun creepy crawly themed crafts as possible. I’d seen some really cute Popsicle stick spiderwebs online where the Popsicle sticks are glued into a star shape but when we actually came to make them my 4yo son found it too tricky to twist the yarn around the sticks. He was pretty disappointed as he really wanted to make a spiderweb after seeing them online so we decided to come up with our own easier version. After a good amount of time (and a little frustration) playing around with the Popsicle sticks we eventually came up with this cute diamond shaped Popsicle stick spider web craft. My little guy found them really easy to make and had tons of fun with them too!
Here’s what we used
Popsicle sticks
Yarn
Black Pom pom
Black paper
Googly eyes
Glue
Scissors
Here’s how we made our popsicle stick spider web craft
Take four popsickle sticks and glue them together into a diamond shape, ensure that the two points at the widest part overlap slightly as you can see above. Then take one end of your yarn and tie it on to one of the sticks.
Wrap the yarn all around the outside of the stick frame. Little ones may need some help to ensure that the yarn is pulled tout.
When your happy with your web, take your yarn and wrap it around the longest part of your diamond 2-3 times. It should sit nicely between the lollipop sticks that you overlapped. Once finished chop your yarn and then tie the loose end to your stick frame. Next it’s time to make your little spider! To make ours we cut out four long paper strips and glued them together in the centre to make 8 legs. We then added some googly eyes to a pom pom before sticking it down onto the legs.
Glue your spider on to the front of your string web. Tie a loop through under the string between the overlapped Popsicle sticks and your decoration is ready to hang!
As a mother there is no amount of money that can buy you a gift so cherished as one made by your child. This little DIY mothers day frame is really sweet and straightforward to make and it looks great at home or on an office desk. So why not share the love this mothers day with this easy DIY craft.
You will need
Paint and paintbrush
4 thick popsicle sticks
White and Coloured Paper
Glue gun/strong glue
Scissors
Marker
Start off by painting your popsicle sticks in your chosen colours. We used light pink and light purple. When you’ve finished, pop your sticks aside to dry.
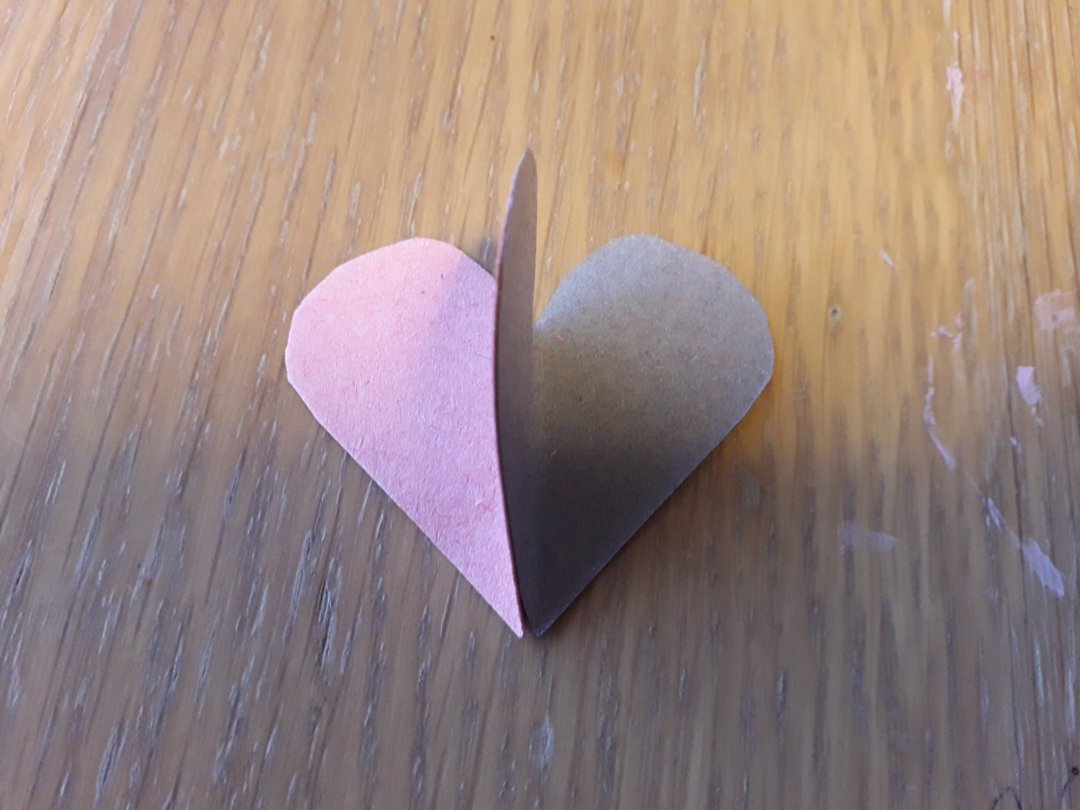
Whilst your sticks are drying you can make the decorations for your frame. To make the hearts put two coloured pieces of paper together and cut a heart shape out of them. cutting both at the same time will give you two equal size and shape hearts. Fold both your hearts In half. Glue one half of one heart to one half of the other. This should give you the t shape that you can see above. You’ll need to make two of these.
To make the daisies, cut out a white flower and then glue a yellow circle in the centre. You’ll need two daisies.
Once your sticks are dry glue them into a square as you can see above.
Add your little handmade decorations to the corners and optionally write a message on your frame. finish off your frame by cutting out a picture and gluing it to the back of your frame. Now all thats left is to do is gift your creation to a special someone!